Yoga Practical · Āsana library

37 āsanas: how, why, and when to take care

Every posture from the diploma’s āsana handout, rewritten in plain language: the steps, what each pose can help with, and who should be careful.

The photos are AI-generated to show each final position. Learn new poses with a teacher, and check with your doctor if you are pregnant, injured or managing a health condition.

Standing

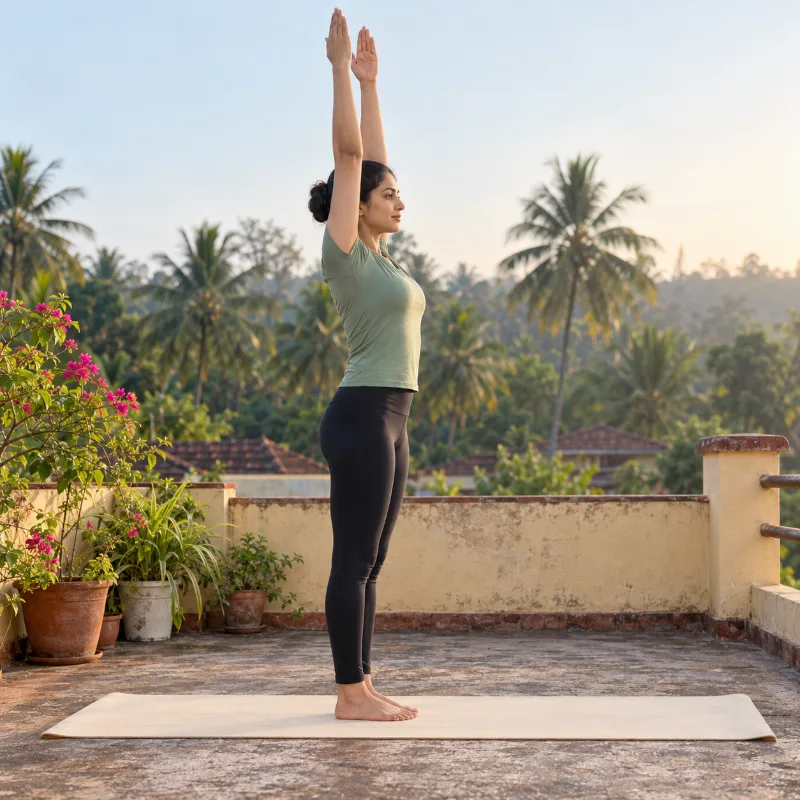
Woman demonstrating Tāḍāsana, mountain pose

Tāḍāsana

Tadasana · Mountain Pose

Tāḍāsana is the basic standing pose that many other standing postures start from, built on steadiness and balance. Tāḍa means 'mountain' and āsana means 'pose'.

How to do it

  1. Stand tall with your feet together or slightly apart, spine upright and your weight spread evenly across both feet.
  2. Firm your thighs, lift your kneecaps a little and draw in your core.
  3. Let your arms hang by your sides with your palms facing forward.
  4. Relax your shoulders and roll them slightly back so your chest opens.
  5. Breathe slowly and deeply, feeling steady and grounded.
  6. For a deeper stretch, breathe in and raise your arms overhead, either parallel or with palms joined.
  7. Stay for 30 seconds to a minute, then breathe out, lower your arms if raised, and notice how your body feels.

Hold: 30 seconds to 1 minute

Benefits

  • Can help improve posture and reduce slouching.
  • Builds balance and better body alignment.
  • Works the thighs, knees and abdominal muscles.
  • May support healthy circulation.
  • Can help you feel calmer and more focused.

Precautions

  • Low blood pressure: avoid this pose, as standing still for long can make you dizzy or light-headed.
  • Vertigo or balance problems: take care and practise near a wall for support.
  • Chronic knee or back pain: don't lock your knees, and use your core for support.
  • Severe headache or insomnia: avoid holding the pose for long.
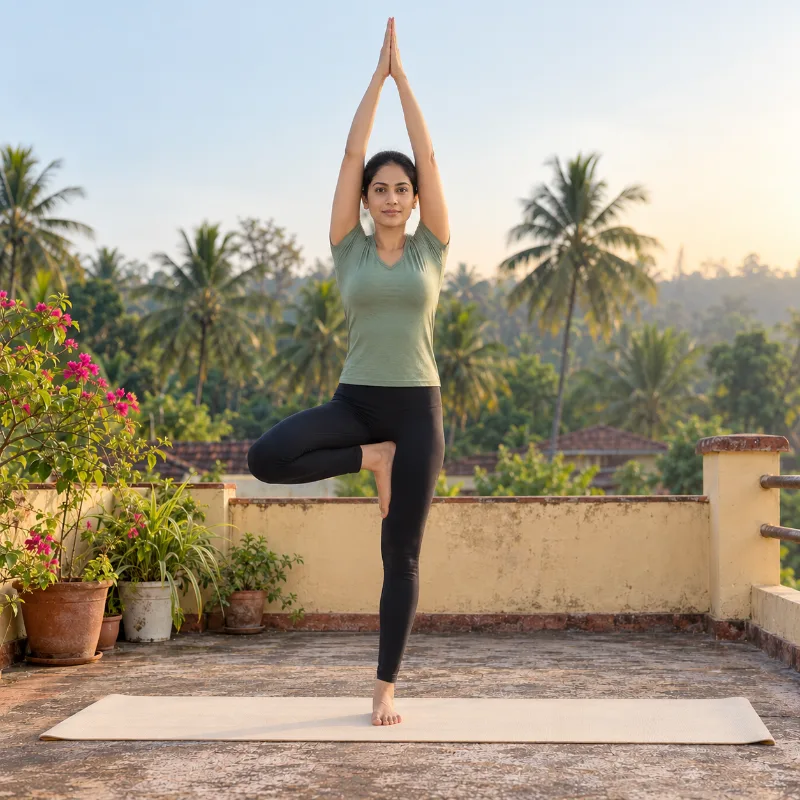
Woman demonstrating Vṛkṣāsana, tree pose

Vṛkṣāsana

Vrikshasana · Tree Pose

Vṛkṣāsana is a one-legged balancing pose in which you stand tall and steady like a tree. Vṛkṣa means 'tree' and āsana means 'pose'.

How to do it

  1. Start in Tāḍāsana with your feet together and arms by your sides.
  2. Slowly shift your weight onto your left leg, keeping it straight.
  3. Lift your right foot and press the sole firmly against your inner left thigh, toes pointing down. Keep it off the knee.
  4. Lengthen your spine and engage your core to stay steady.
  5. Join your palms in namaste and stretch your arms overhead for a deeper stretch.
  6. Fix your gaze on one point ahead and hold for 20–30 seconds, breathing deeply.
  7. Slowly lower your right foot, return to standing and repeat with the left foot on the right thigh.

Hold: 20–30 seconds each side

Benefits

  • Builds physical balance and a steadier mind.
  • Strengthens the legs, ankles and core.
  • Helps concentration and mindfulness.
  • Supports good posture.
  • Opens the hips and pelvic area.
  • Can help ease stress and anxiety.

Precautions

  • Vertigo or dizziness: if you feel unsteady, practise beside a wall.
  • Knee or hip injury: keep the foot off the knee joint and keep a slight softness in the standing knee.
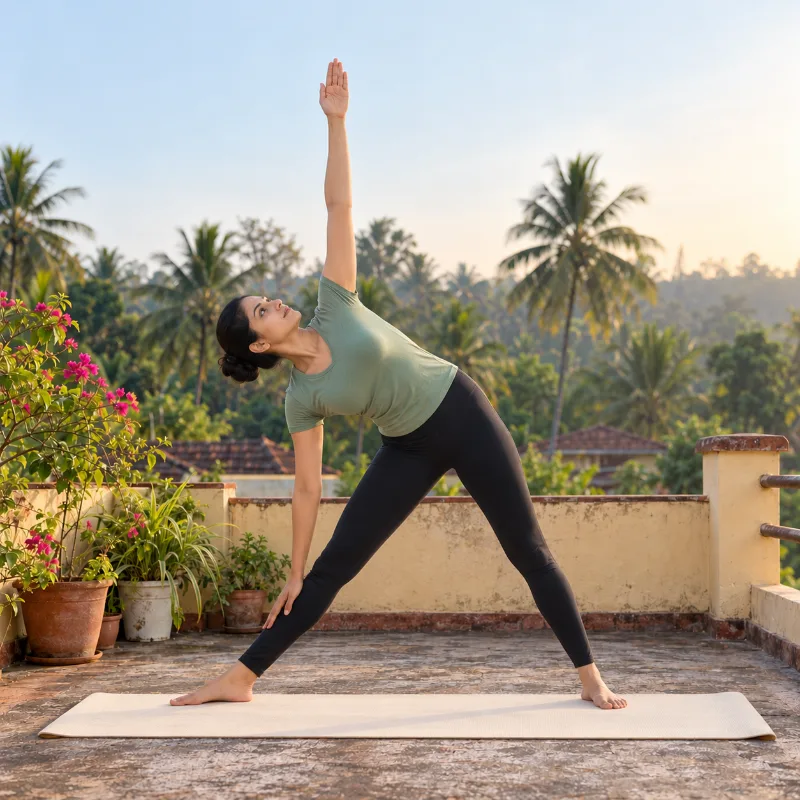
Woman demonstrating Trikoṇāsana, triangle pose

Trikoṇāsana

Trikonasana · Triangle Pose

Trikoṇāsana is a standing side stretch in which the body forms a triangle shape. Trikoṇa means 'triangle' and āsana means 'pose'.

How to do it

  1. Start in Tāḍāsana, then step your feet about 3–4 feet apart.
  2. Turn your right foot out 90 degrees and your left foot slightly in, with both heels in one line.
  3. Stretch your arms out to the sides at shoulder height, parallel to the floor, palms down.
  4. Breathe in, then as you breathe out bend sideways to the right, keeping your waist straight, and rest your right hand on your ankle, shin or the floor, whichever you can reach.
  5. Stretch your left arm up towards the sky in line with your right arm, and turn your head slightly up to look at your left hand.
  6. Hold for 20–30 seconds, breathing deeply.
  7. Breathe in as you come back up, then repeat on the other side.

Hold: 20–30 seconds each side

Benefits

  • Stretches the spine, hips, waist and sides of the body.
  • Strengthens and tones the legs and core.
  • May support digestion by working the abdominal area.
  • Can help calm the mind and ease stress.
  • May ease tension in the lower back and shoulders.
  • Builds balance, coordination and body awareness.

Precautions

  • Severe back or neck pain, or spinal problems: avoid this pose and don't overstretch.
  • High blood pressure: don't look upwards in the pose.
  • Low blood pressure: come up slowly to avoid dizziness.
  • Recent ankle, knee or hip injury: modify the pose.
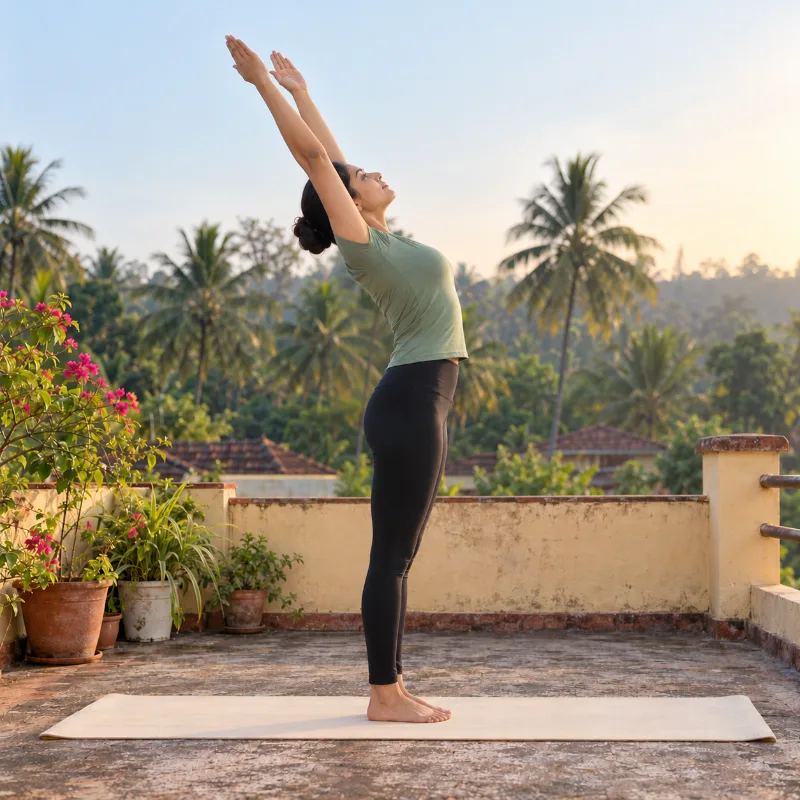
Woman demonstrating Hastottānāsana, raised arms pose

Hastottānāsana

Hastottanasana · Raised Arms Pose

Hastottānāsana is a standing pose in which you stretch your arms overhead and arch back gently. Hasta means 'hands', uttāna means 'intense stretch' and āsana means 'pose'.

How to do it

  1. Start in Tāḍāsana with your feet together and arms by your sides.
  2. Breathe in and slowly raise both arms overhead, shoulder-width apart or with palms joined.
  3. Lengthen your spine upwards and feel a gentle stretch.
  4. If it feels comfortable, tilt your head back slightly and arch your upper back gently, keeping your core engaged.
  5. Hold for 10–15 seconds, breathing deeply.
  6. Breathe out as you slowly lower your arms and return to standing.

Hold: 10–15 seconds

Benefits

  • Can help improve posture and reduce slouching.
  • Strengthens the back and shoulders and adds upper-body flexibility.
  • Stretches the chest and abdomen and opens up the breath.
  • May support digestion.
  • Can lift energy and ease fatigue.
  • Encourages relaxation and deeper breathing.

Precautions

  • Severe back pain or spinal problems: skip the backbend.
  • High blood pressure or dizziness: don't arch back too far.
  • Pregnancy: keep your feet slightly apart for stability and avoid deep backbends.
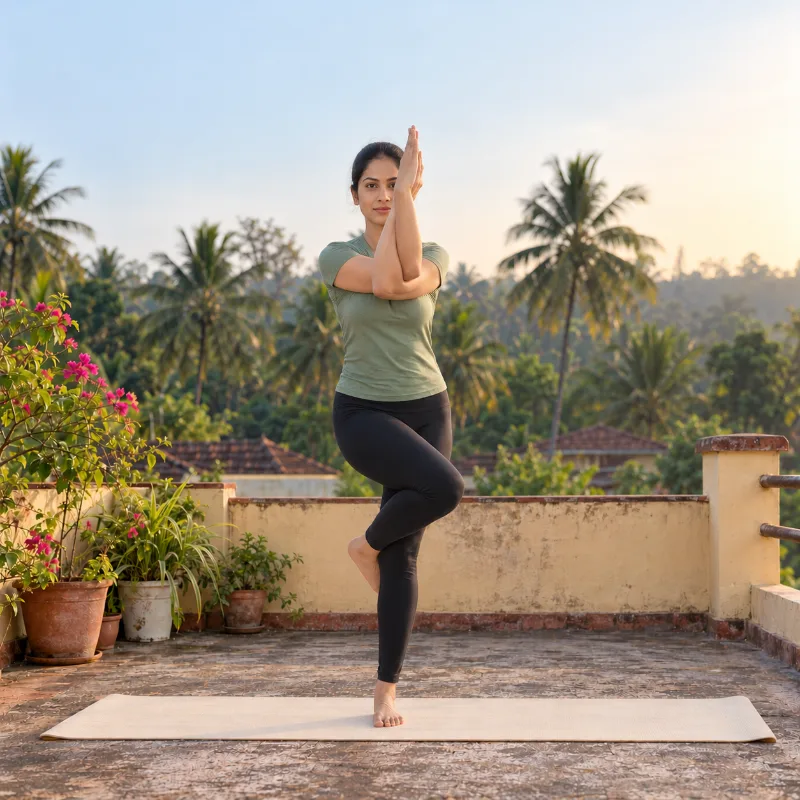
Woman demonstrating Garuḍāsana, eagle pose

Garuḍāsana

Garudasana · Eagle Pose

Garuḍāsana is a standing balance in which the arms and legs wrap around each other. Garuḍa is the eagle, a mythical bird in Hindu tradition, and āsana means 'pose'.

How to do it

  1. Start in Tāḍāsana with your feet together and arms by your sides.
  2. Bend your knees slightly and shift your weight onto your left foot.
  3. Lift your right leg, cross it over your left thigh and, if you can, hook your right foot behind your left calf.
  4. Stretch your arms forward and cross your right arm over your left at the elbows.
  5. Bend your elbows and bring your palms together in namaste, or let the backs of your hands touch if your palms don't meet.
  6. Fix your gaze on one point to stay balanced and hold for 15–30 seconds, breathing deeply.
  7. Slowly unwind your arms and legs, return to Tāḍāsana and repeat on the other side.

Hold: 15–30 seconds each side

Benefits

  • Builds balance, coordination and body awareness.
  • Strengthens the thighs, calves, ankles and core.
  • Stretches the shoulders and upper back, easing tension in the shoulders and neck.
  • Helps focus and concentration.
  • Adds flexibility in the hips, legs and arms.
  • May help circulation around the joints and muscles.

Precautions

  • Knee or ankle injury: avoid this pose, as the wrapping can strain weak joints.
  • Balance problems: practise near a wall or keep your toes touching the floor.
  • Shoulder or wrist pain: simply cross your arms without wrapping them.
  • High or low blood pressure: don't hold the pose for long.
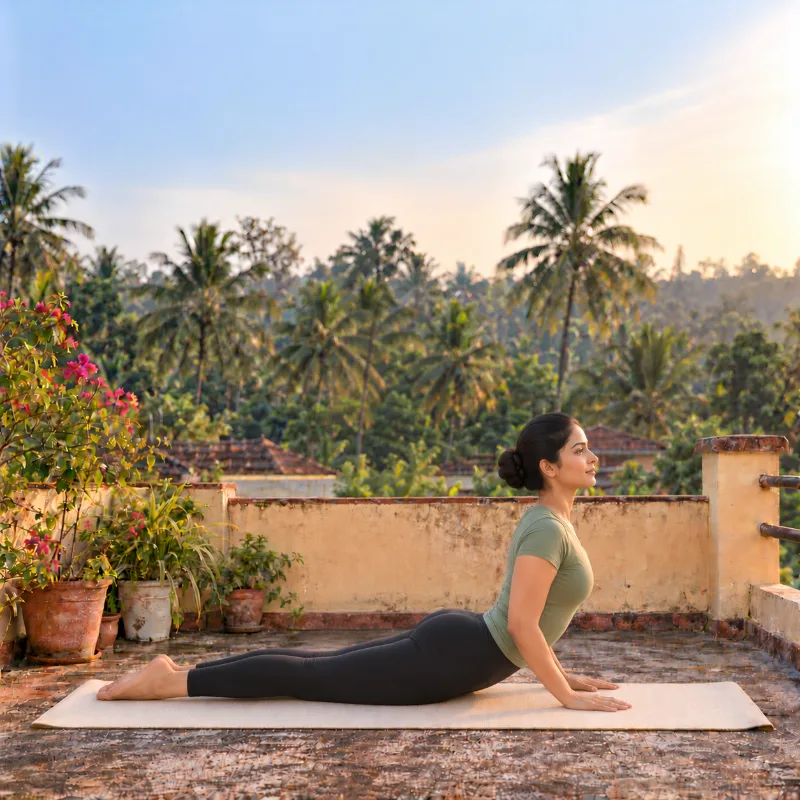
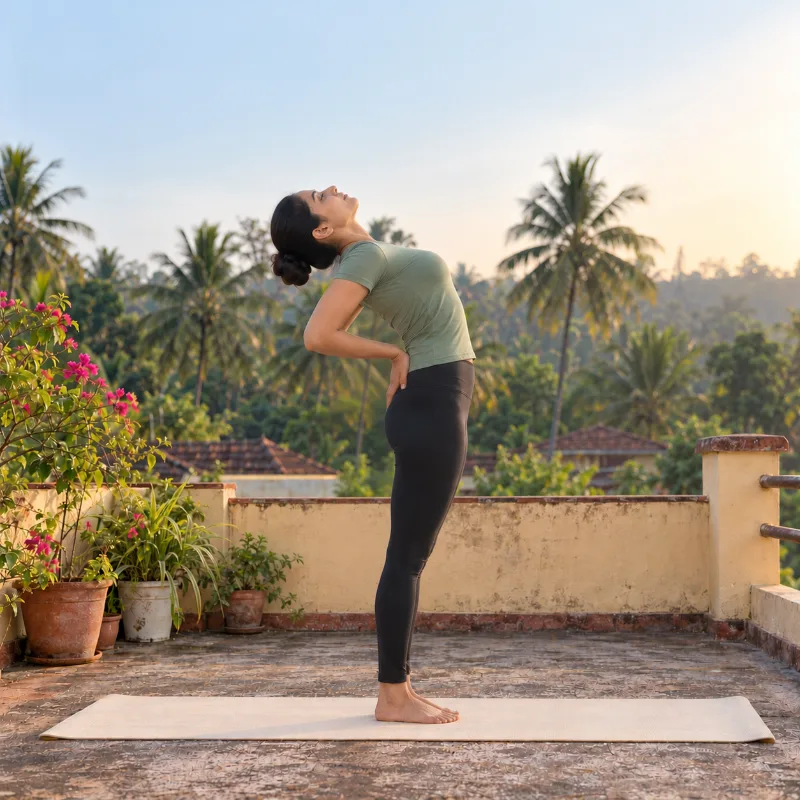
Woman demonstrating Ardha Cakrāsana, half wheel pose

Ardha Cakrāsana

Ardha Chakrasana · Half Wheel Pose

Ardha Cakrāsana is a gentle standing backbend that builds spinal flexibility and back strength. Ardha means 'half', cakra means 'wheel' and āsana means 'pose'.

How to do it

  1. Start in Tāḍāsana with your feet together and arms by your sides.
  2. Place your hands on your lower back, fingers pointing down, to support it.
  3. Breathe in, lift and open your chest and gently arch your back, letting your head tilt back.
  4. Hold for 10–30 seconds, breathing deeply.
  5. Breathe out and slowly bring your spine back upright.
  6. If it feels comfortable, repeat for 2–3 rounds.

Hold: 10–30 seconds, 2–3 rounds

Benefits

  • Improves spinal flexibility and eases stiffness.
  • Strengthens the lower back, abdomen and hip muscles.
  • Opens the chest and encourages fuller breathing.
  • May ease lower-back discomfort from long hours of sitting.
  • May support digestion.
  • Can help ease fatigue and stress.

Precautions

  • Severe back or neck pain: avoid this pose and check with a doctor before practising.
  • High blood pressure or dizziness: don't hold the pose for long or arch too deeply.
  • Pregnancy: practise with care and avoid bending back deeply.
  • Hernia or recent abdominal surgery: avoid this pose.
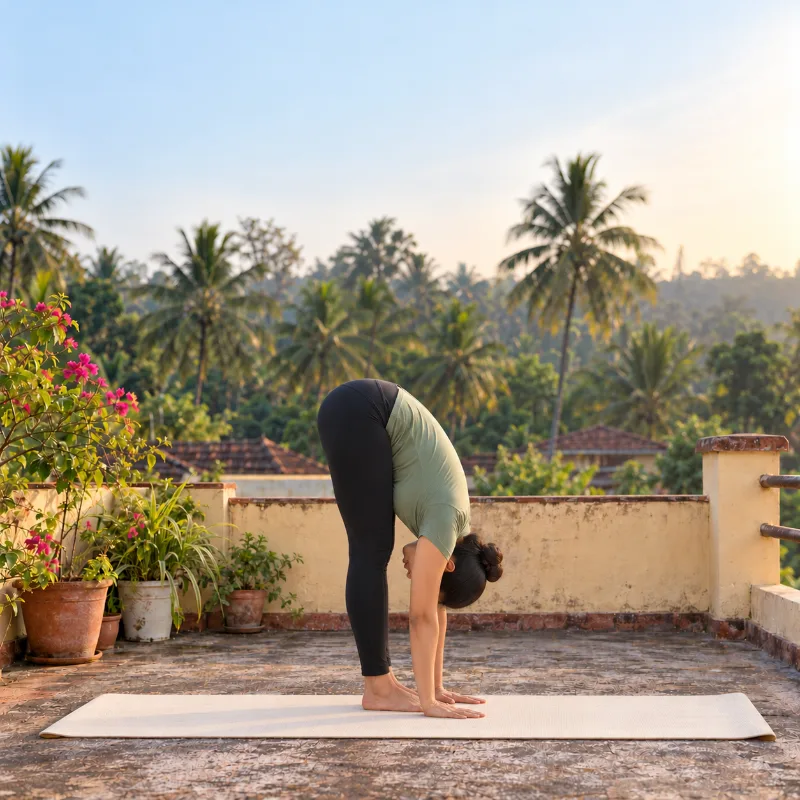
Woman demonstrating Pādahastāsana, hand-to-foot pose

Pādahastāsana

Padahastasana · Hand-to-Foot Pose

Pādahastāsana is a standing forward bend that gives a deep stretch to the back and legs, and is one of the poses in the Sun Salutation (Surya Namaskar). Pāda means 'foot', hasta means 'hand' and āsana means 'pose'.

How to do it

  1. Start in Tāḍāsana with your feet together and arms by your sides.
  2. Breathe in and stretch your arms overhead to lengthen your spine.
  3. Breathe out and fold forward from the hips, bringing your torso towards your legs.
  4. Place your hands beside your feet, or hold your ankles or shins if you can't reach.
  5. Try to keep your knees straight, bending them slightly if needed, and don't overstretch.
  6. Let your head hang loosely, keep the spine long and hold for 20–30 seconds, breathing steadily.
  7. Breathe in and slowly come back up to standing with a straight spine.

Hold: 20–30 seconds

Benefits

  • Stretches the hamstrings, calves and spine.
  • Works the abdominal and leg muscles.
  • May support digestion.
  • Can help calm the nervous system and improve focus.

Precautions

  • Severe back or neck pain, or spinal problems: avoid this pose, or bend with great care.
  • High or low blood pressure: bend slowly, as sudden bending can cause dizziness.
  • Knee or hamstring injury: keep your knees slightly bent to avoid strain.
  • Pregnancy: avoid deep forward bends.
  • Hernia or recent abdominal surgery: avoid this pose.
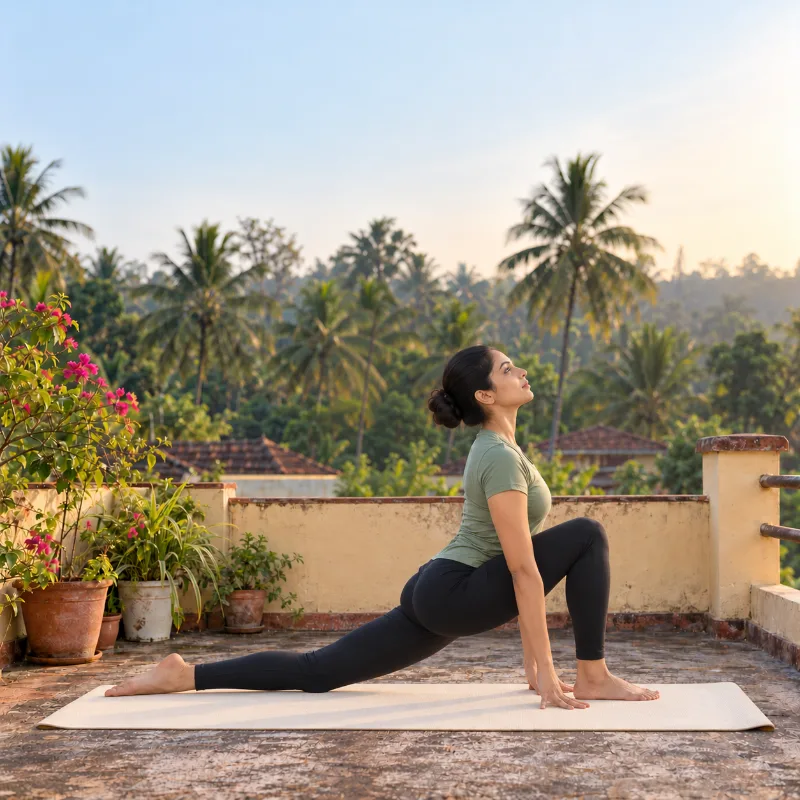
Woman demonstrating Aśva Sañcalanāsana, equestrian pose

Aśva Sañcalanāsana

Ashwa Sanchalanasana · Equestrian Pose

Aśva Sañcalanāsana is a low lunge that resembles a rider's stance and is one of the poses in the Sun Salutation (Surya Namaskar). Aśva means 'horse', sañcalana means 'movement' and āsana means 'pose'.

How to do it

  1. Stand straight in Tāḍāsana.
  2. Breathe out, fold forward and place your palms on the floor beside your feet.
  3. Breathe in and stretch your right leg back as far as you can, keeping your left foot between your hands.
  4. Lower your right knee to the floor and bend your left knee to 90 degrees.
  5. Open your chest, keep your back straight and look forward or slightly up.
  6. Hold for 15–30 seconds, breathing normally.
  7. Breathe out, bring your right leg forward and repeat with the left leg.

Hold: 15–30 seconds each side

Benefits

  • Strengthens and tones the thighs, calves and hamstrings.
  • Stretches the hips and groin.
  • Supports posture and back flexibility.
  • Builds balance and coordination.
  • Opens the chest and encourages fuller breathing.
  • May support digestion.

Sitting & kneeling

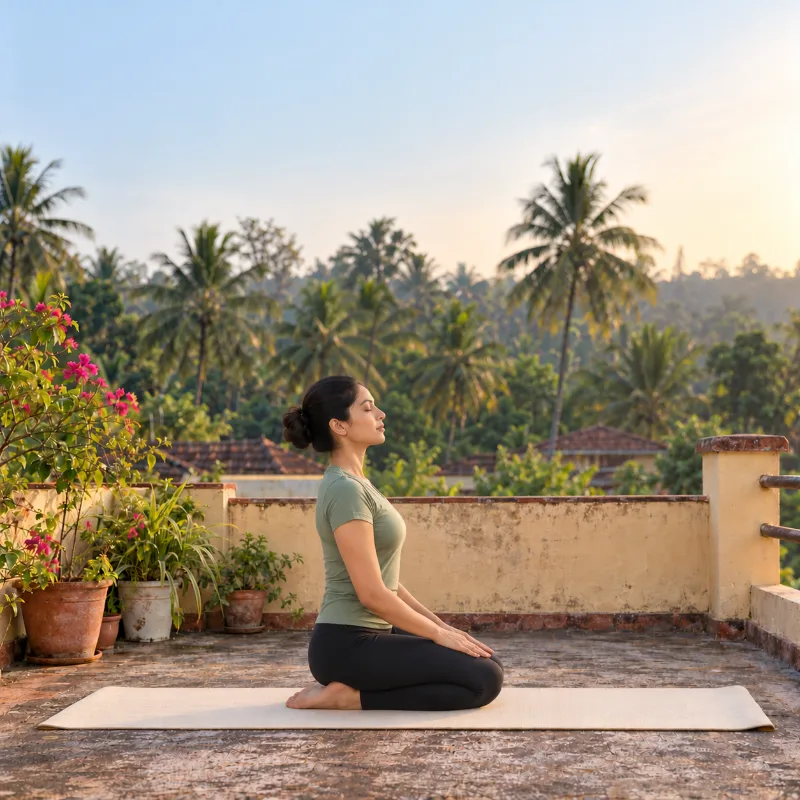
Woman demonstrating Vajrāsana, thunderbolt pose

Vajrāsana

Vajrasana · Thunderbolt Pose

Vajrāsana is a simple kneeling pose used for meditation and good posture, and is traditionally practised after meals to help digestion. Vajra means 'thunderbolt' or 'diamond' and āsana means 'pose'.

How to do it

  1. Kneel on the floor with your knees together and your spine straight.
  2. Sit back so your buttocks rest on your heels, with your feet flat.
  3. Rest your hands on your thighs, palms down, with your shoulders relaxed.
  4. Keep your spine upright and your core lightly engaged, without slouching.
  5. Breathe deeply and stay relaxed for 5–10 minutes.
  6. To come out, slowly stretch your legs forward and relax them.

Hold: 5–10 minutes

Benefits

  • May support digestion and ease bloating.
  • Supports good posture and spinal alignment, which may ease back discomfort.
  • Calms the mind and suits meditation and deep breathing.
  • Improves flexibility in the knees and ankles.

Precautions

  • Severe knee or ankle pain: avoid, or use a cushion or modify the pose.
  • Pregnancy: keep your knees slightly apart for comfort.
  • Recent leg or spine surgery: check with a doctor before practising.
  • Sciatica or varicose veins: practise under guidance or keep it short.
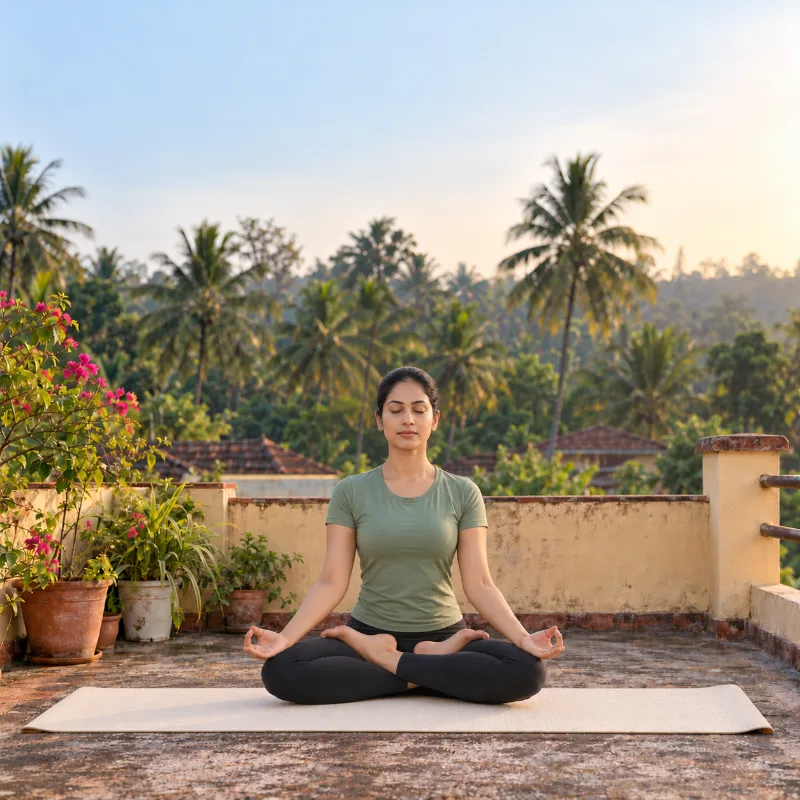
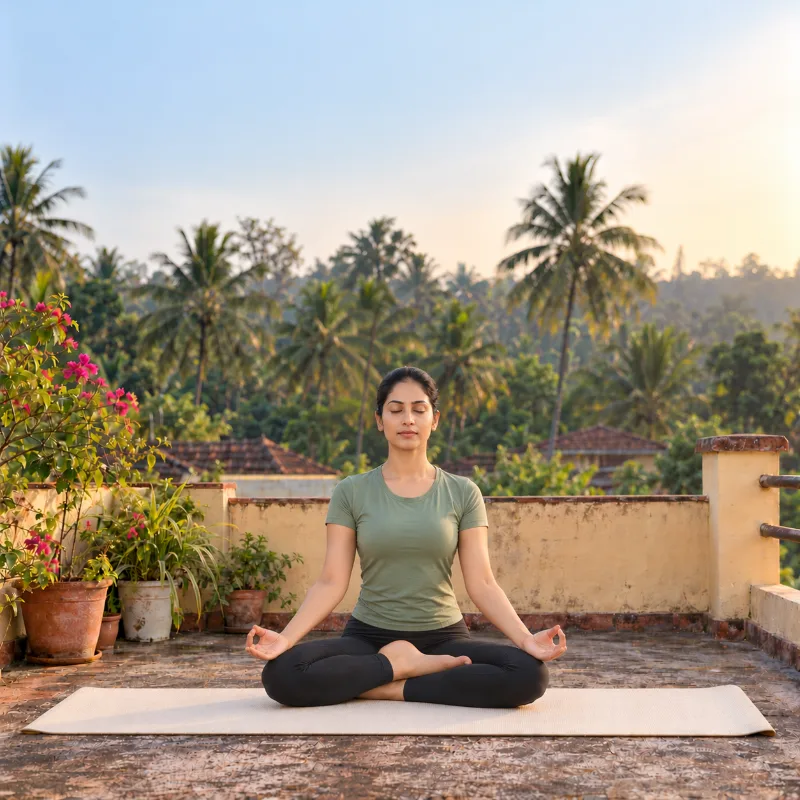
Woman demonstrating Padmāsana, lotus pose

Padmāsana

Padmasana · Lotus Pose

Padmāsana is the classic cross-legged seated pose used for meditation and pranayama. Padma means 'lotus' and āsana means 'pose'.

How to do it

  1. Sit with your legs stretched out in front and your spine straight.
  2. Bend your right knee and place the foot on your left thigh, sole facing up, with the heel close to your lower abdomen.
  3. Bend your left knee and place the foot on your right thigh, adjusting until both knees rest on the floor.
  4. Rest your hands on your knees in chin mudra (tip of the thumb and index finger touching).
  5. Keep your spine upright and shoulders relaxed, close your eyes and breathe deeply.
  6. Stay for 5–10 minutes, building up the time as you become comfortable.
  7. Release slowly and stretch your legs; switch the leg positions if you practise again.

Hold: 5–10 minutes

Benefits

  • Supports concentration, mental clarity and meditation.
  • Helps you sit upright and builds spinal strength.
  • Calms the nervous system and eases stress.
  • May support digestion.
  • Gradually increases flexibility in the hips, knees and ankles.

Precautions

  • Knee or hip injury: avoid the full pose and use Ardha Padmāsana (Half Lotus) instead.
  • Sciatica or lower-back pain: sit on a cushion or against a wall for support.
  • Pregnancy: check with a doctor before practising.
  • Tight hips: do hip-opening exercises before attempting the full Lotus.
Woman demonstrating Siddhāsana, accomplished pose

Siddhāsana

Siddhasana · Accomplished Pose

Siddhāsana is a seated meditation pose often taught as an easier alternative to Padmāsana. Siddha means 'accomplished' or 'perfect' and āsana means 'pose'.

How to do it

  1. Sit with your legs stretched out in front and your spine straight.
  2. Bend your left leg and place the heel against the perineum, with the sole against your inner right thigh.
  3. Bend your right leg and place it over your left ankle, with the right heel near the pubic bone.
  4. Rest your hands on your knees in chin mudra (tip of the thumb and index finger touching).
  5. Keep your spine straight and shoulders relaxed, close your eyes and breathe deeply.
  6. Stay for 5–15 minutes, gradually lengthening the time.
  7. Release slowly and stretch your legs; switch the leg positions if you practise again.

Hold: 5–15 minutes

Benefits

  • Supports focus, stillness and meditation.
  • Helps posture and keeps the back upright.
  • Gradually improves hip and knee mobility.
  • Encourages deep breathing and suits pranayama.
  • Calms the nervous system and eases stress.

Precautions

  • Knee, hip or ankle pain: avoid the full pose; use cushions or sit in Sukhāsana (Easy Pose) instead.
  • Sciatica or lower-back problems: sit on a cushion for better alignment.
  • Pregnancy: check with a doctor before practising.
  • Tight hips: do hip-opening stretches first.
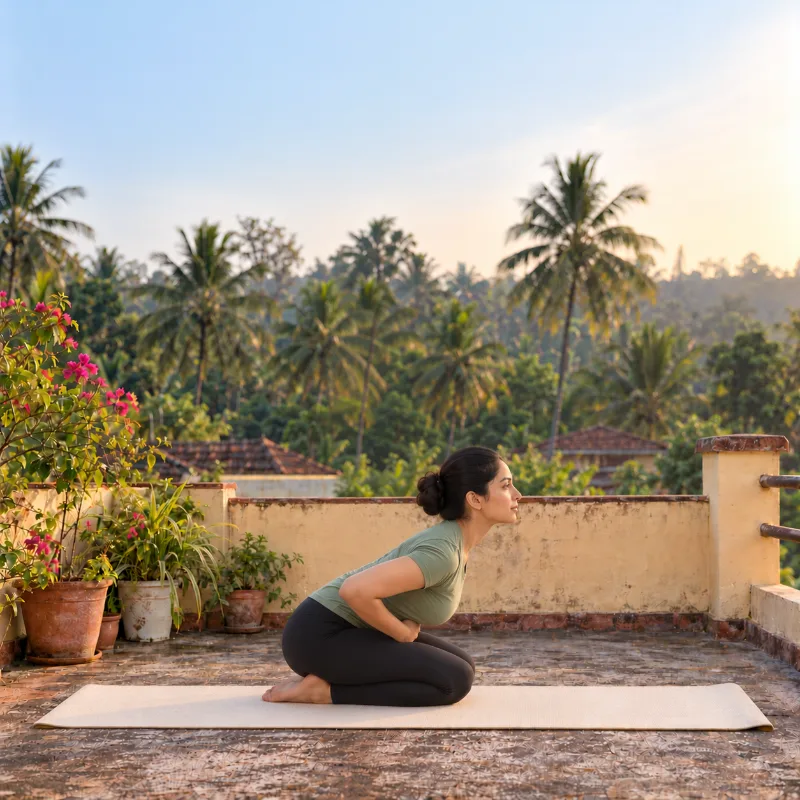
Woman demonstrating Maṇḍūkāsana, frog pose

Maṇḍūkāsana

Mandukasana · Frog Pose

Maṇḍūkāsana is a kneeling forward bend with the fists pressed into the belly, stretching the hips and working the abdominal area. Maṇḍūka means 'frog' and āsana means 'pose'.

How to do it

  1. Start in Vajrāsana, kneeling with your feet together and sitting on your heels.
  2. Make two fists and press them into your abdomen, one on each side of the navel.
  3. Breathe in deeply, then breathe out and lean forward, keeping your back straight.
  4. Press your abdomen gently against your thighs, looking forward or down.
  5. Hold for 10–30 seconds, breathing deeply and relaxing.
  6. Breathe in and slowly sit back up.
  7. Repeat 2–3 times, lengthening the hold over time.

Hold: 10–30 seconds, 2–3 rounds

Benefits

  • May support digestion and ease constipation.
  • Strengthens the lower back and supports posture.
  • Opens the hips and stretches the thighs.

Precautions

  • Severe knee or ankle pain: avoid, or use cushions or a gentle forward bend instead.
  • Pregnancy: avoid putting pressure on the abdomen.
  • Recent abdominal or spine surgery: check with a doctor before practising.
  • High blood pressure or heart problems: don't hold the pose for long.
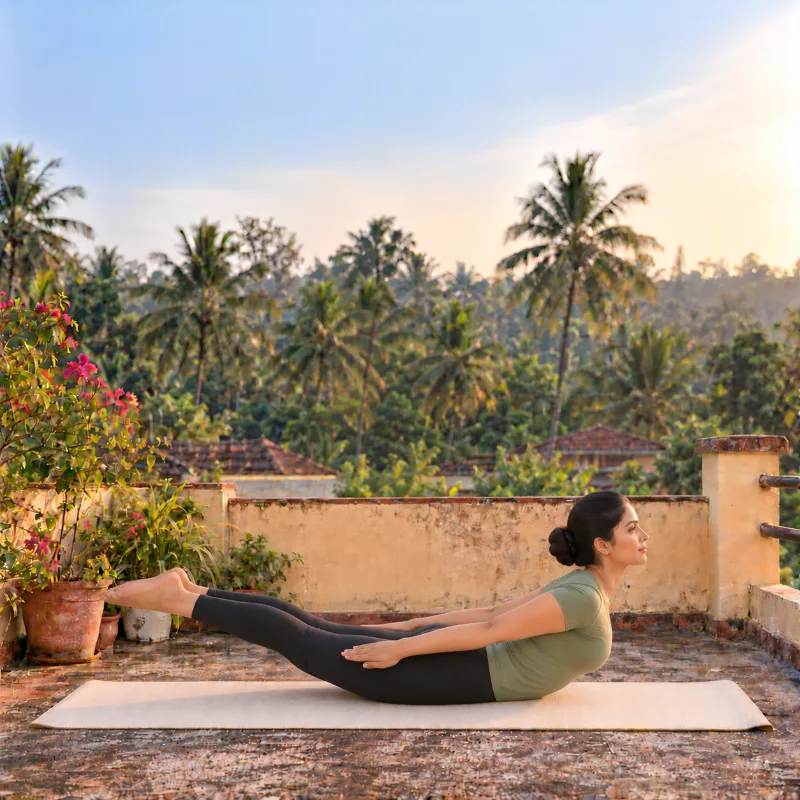
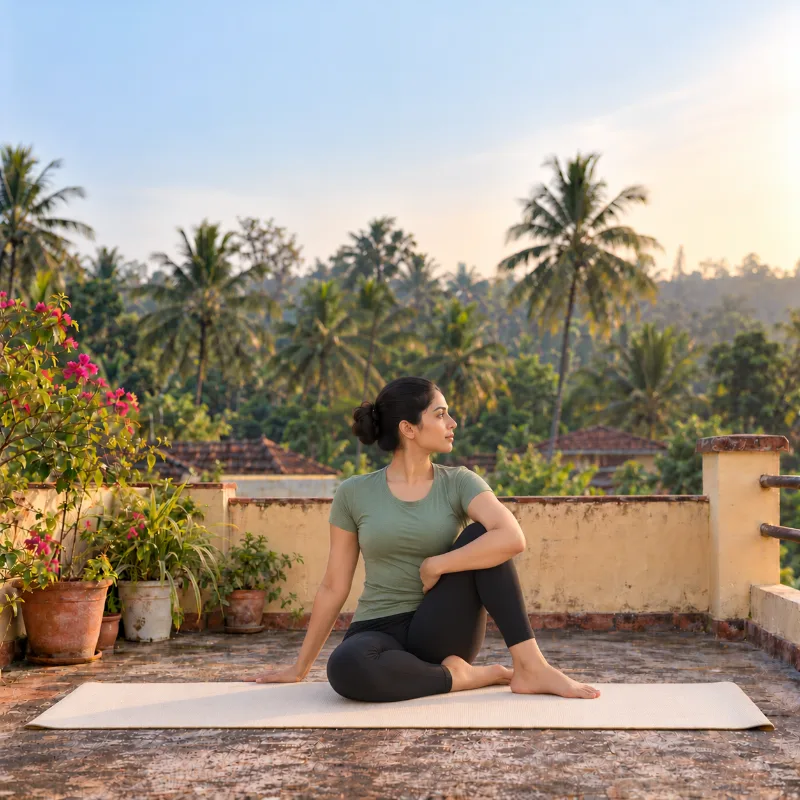
Woman demonstrating Vakrāsana, twisted pose

Vakrāsana

Vakrasana · Twisted Pose

Vakrāsana is a simple seated spinal twist. Vakra means 'twisted' and āsana means 'pose'.

How to do it

  1. Sit with your legs stretched forward, back straight and hands by your sides.
  2. Bend your right leg and place the foot beside your left knee, sole flat on the floor.
  3. Place your right hand on the floor behind you, near your tailbone, for support.
  4. Breathe out and twist your torso to the right, bringing your left arm around your right knee.
  5. Look over your right shoulder, keeping your spine tall without hunching.
  6. Hold for 10–30 seconds, breathing deeply.
  7. Breathe in, release slowly to the centre and repeat on the other side.

Hold: 10–30 seconds each side

Benefits

  • Improves spinal flexibility and posture, easing stiffness in the back.
  • May support digestion and ease constipation.
  • Strengthens the obliques, core and lower back.
  • May ease mild lower-back discomfort.

Precautions

  • Severe back or spinal injury: avoid, or do only a gentle twist.
  • Pregnancy: avoid deep twisting and check with a doctor.
  • Recent abdominal or hip surgery: avoid putting pressure on the abdomen.
  • Herniated disc or severe sciatica: practise only under expert guidance.
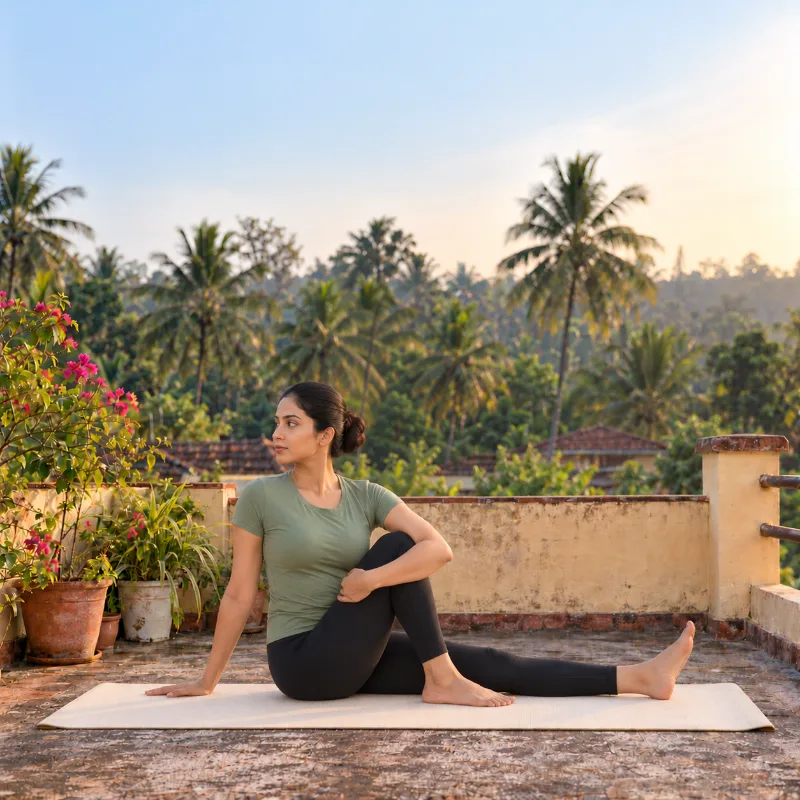
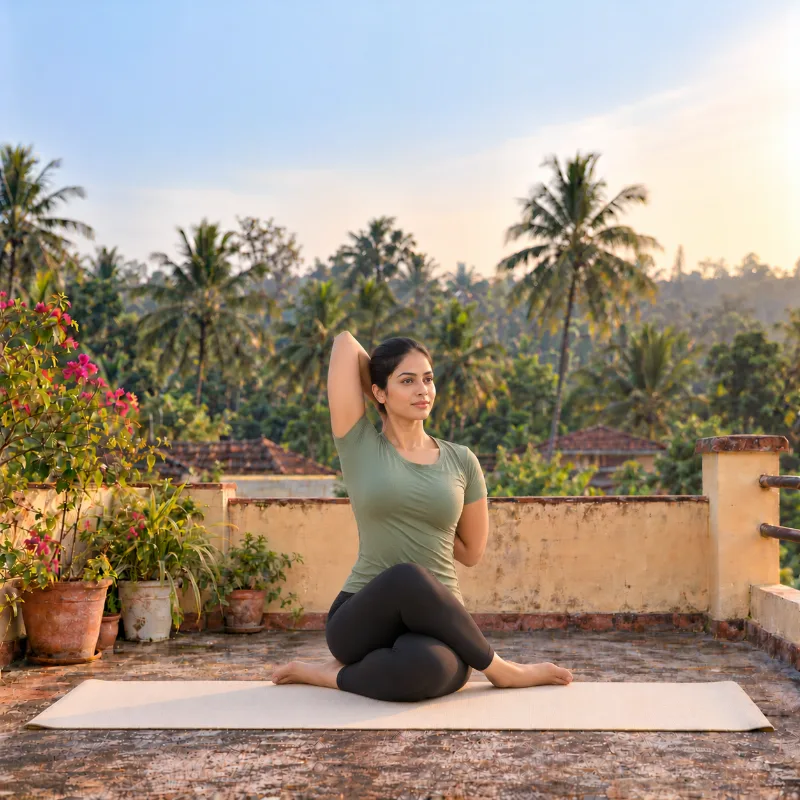
Woman demonstrating Ardha Matsyendrāsana, half lord of the fishes pose

Ardha Matsyendrāsana

Ardha Matsyendrasana · Half Lord of the Fishes Pose

Ardha Matsyendrāsana is a deeper seated twist than Vakrāsana, named after the yogic sage Matsyendranath. Ardha means 'half', matsya 'fish', indra 'lord' and āsana 'pose'.

How to do it

  1. Sit with your legs stretched forward and your spine straight.
  2. Bend your right leg and place the foot flat on the floor outside your left thigh.
  3. Bend your left leg and bring the foot near your right hip, keeping the left knee on the floor.
  4. Twist your torso to the right and place your right hand behind you for support.
  5. Bring your left elbow over your right knee and press against it to deepen the twist.
  6. Look over your right shoulder, keep your spine tall and hold for 20–30 seconds, breathing deeply.
  7. Return to the centre and repeat on the other side.

Hold: 20–30 seconds each side

Benefits

  • Improves spinal flexibility and strength, easing back stiffness.
  • May support digestion and ease constipation.
  • Strengthens and tones the core and oblique muscles.
  • Encourages deeper breathing.
  • May ease lower-back discomfort.

Precautions

  • Severe back or spinal problems: avoid, or do only a gentle twist.
  • Pregnancy: avoid deep twists and check with a doctor.
  • Recent abdominal or spine surgery: practise only under guidance.
  • Herniated disc or severe sciatica: practise with caution.
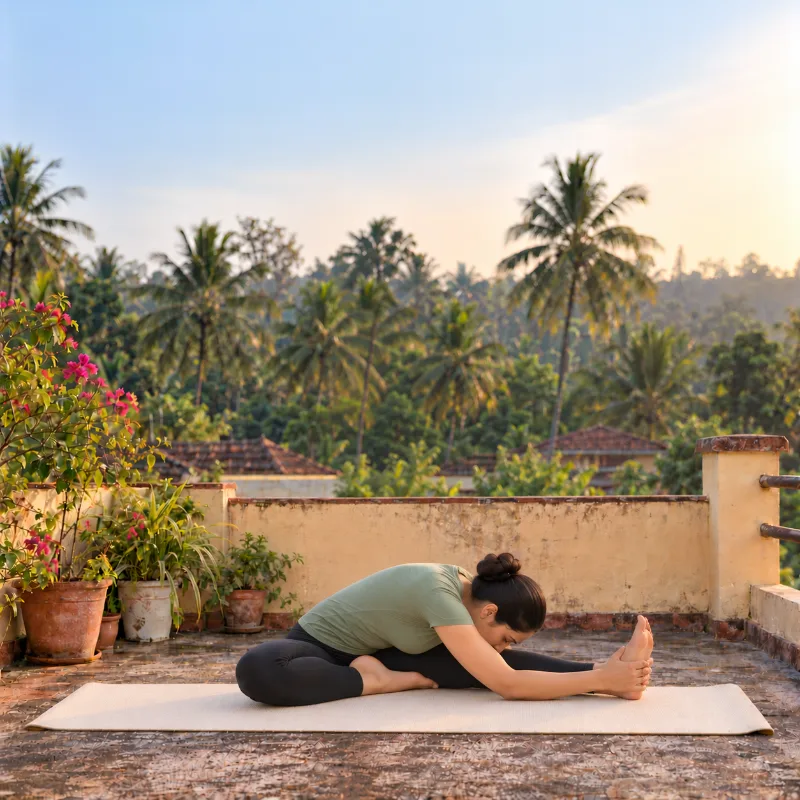
Woman demonstrating Jānu Śīrṣāsana, head-to-knee pose

Jānu Śīrṣāsana

Janu Sirsasana · Head-to-Knee Pose

Jānu Śīrṣāsana is a seated forward bend over one leg that stretches the spine, hamstrings and shoulders. Jānu means 'knee', śīrṣa means 'head' and āsana means 'pose'.

How to do it

  1. Sit with your legs stretched forward, back straight and hands resting on your thighs.
  2. Bend your right knee and place the foot against your inner left thigh, letting the right knee relax on the floor.
  3. Breathe in and stretch your arms up to lengthen your spine.
  4. Breathe out, fold forward from the hips and reach for your left foot with both hands.
  5. Keep your back straight rather than rounded, and bring your head as close to your knee as you can.
  6. Hold for 20–30 seconds, breathing deeply, then breathe in and slowly come back up.
  7. Repeat on the other side.

Hold: 20–30 seconds each side

Benefits

  • Improves flexibility in the hamstrings and lower back.
  • May support digestion and ease constipation.
  • Calms the mind and eases stress.
  • Stretches the spine and shoulders, releasing back tension.

Precautions

  • Severe back or hamstring injury: avoid, or use a cushion or bend the knee slightly.
  • Pregnancy: keep the legs wider and avoid deep forward bends.
  • Herniated disc or sciatica: use props for support.
  • High blood pressure or vertigo: don't hold the pose for long.
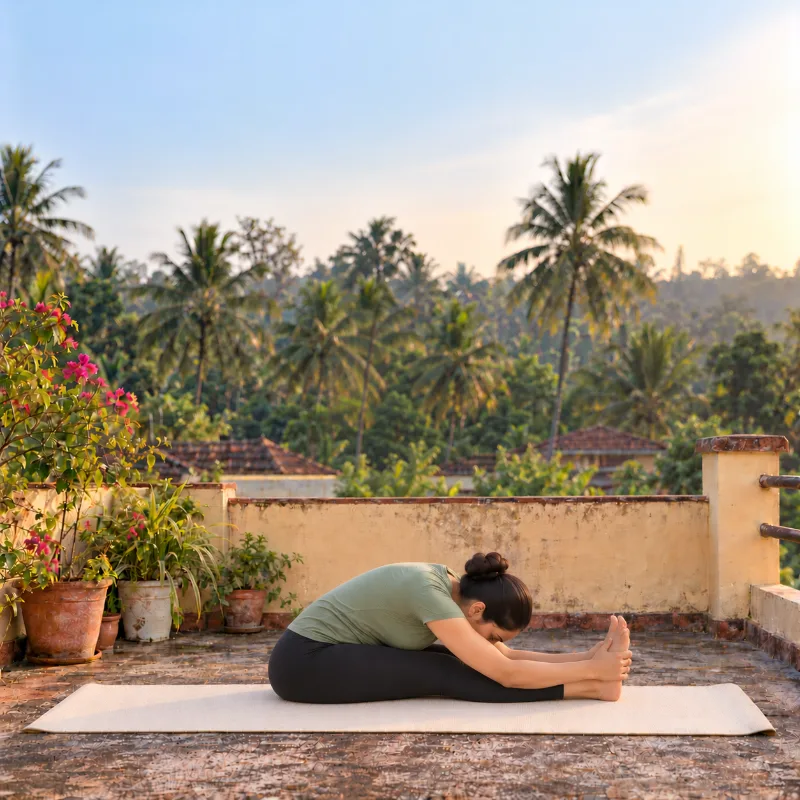
Woman demonstrating Paścimottānāsana, seated forward bend

Paścimottānāsana

Paschimottanasana · Seated Forward Bend

Paścimottānāsana is a seated forward bend that stretches the whole back of the body. Paścima means 'west' (the back of the body), uttāna means 'intense stretch' and āsana means 'pose'.

How to do it

  1. Sit with your legs stretched straight in front, feet together and spine upright.
  2. Breathe in and raise your arms to stretch your spine upwards.
  3. Breathe out, fold forward from the hips and reach for your toes with both hands.
  4. Keep your back straight rather than rounded, and bring your forehead towards your knees.
  5. Hold your feet, ankles or shins; if you can't reach, loop a strap around your feet.
  6. Hold for 20–30 seconds, breathing deeply, then breathe in and slowly come back up.

Hold: 20–30 seconds

Benefits

  • Improves spinal flexibility and posture, easing back stiffness.
  • May support digestion and ease constipation.
  • Stretches the hamstrings, calves and lower back.
  • Calms the nervous system and eases stress.

Precautions

  • Severe back or hamstring injury: avoid, or use a cushion or bend the knees slightly.
  • Pregnancy: keep the legs wider and avoid deep forward bends.
  • Herniated disc or sciatica: use props for support.
  • High blood pressure or vertigo: don't hold the pose for long.
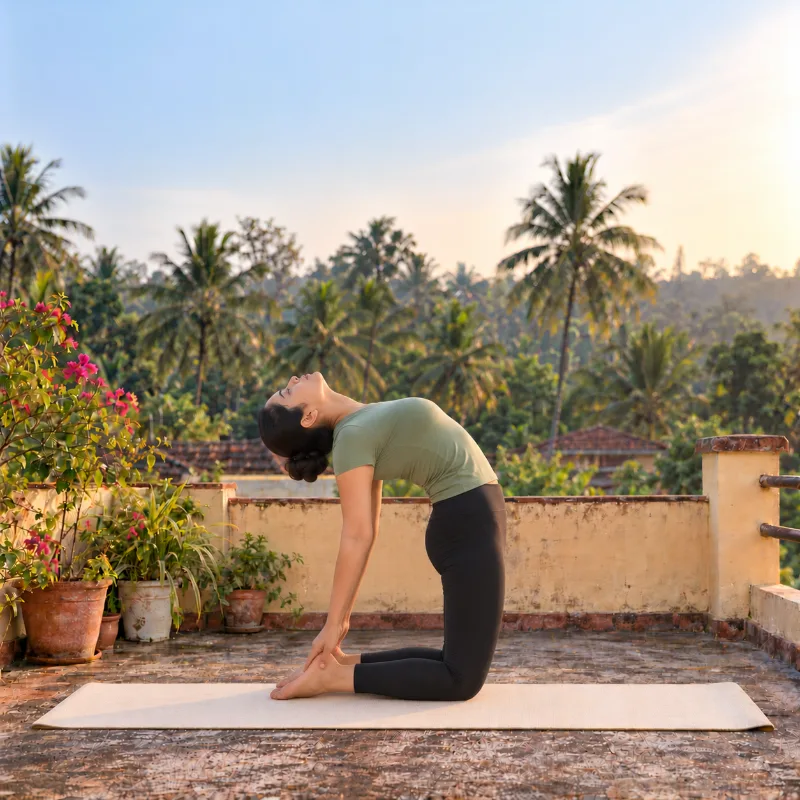
Woman demonstrating Uṣṭrāsana, camel pose

Uṣṭrāsana

Ushtrasana · Camel Pose

Uṣṭrāsana is a deep kneeling backbend that opens the chest and stretches the whole front of the body. Uṣṭra means 'camel' and āsana means 'pose'.

How to do it

  1. Kneel with your knees hip-width apart.
  2. Place your hands on your lower back, fingers pointing down for support.
  3. Breathe in and lift your chest, engaging your core and keeping your thighs vertical.
  4. Breathe out and lean back slowly, reaching for your heels one hand at a time.
  5. Push your hips forward and let your head drop back, going only as deep as you can without strain.
  6. Hold for 20–30 seconds, breathing deeply.
  7. Breathe in, bring your hands back to your lower back and come up gently, then sit in Vajrāsana for a few breaths.

Hold: 20–30 seconds

Benefits

  • Improves spinal flexibility and posture and strengthens the back.
  • Opens the chest and encourages fuller breathing.
  • May support digestion and ease constipation.
  • May ease lower-back tension.
  • Can help reduce stress and anxiety.
  • Works the thighs and hip flexors.

Precautions

  • Severe back, neck or shoulder injury: avoid, or modify with support.
  • High or low blood pressure: practise only under supervision.
  • Pregnancy: avoid deep backbends.
  • Herniated disc or migraine: skip the pose, or do only a slight backbend.
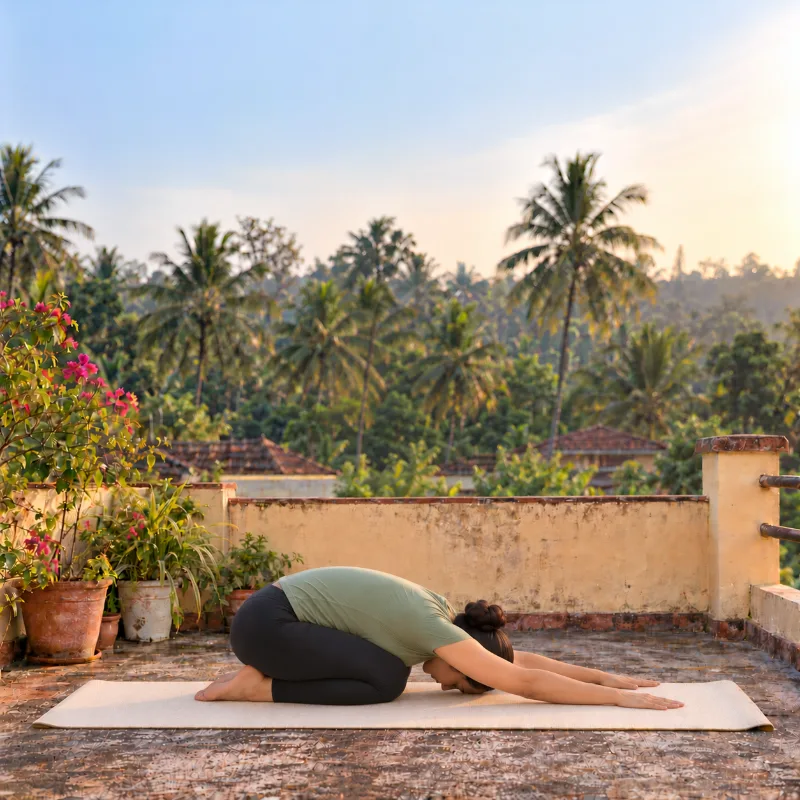
Woman demonstrating Śaśāṅkāsana, hare pose

Śaśāṅkāsana

Shashankasana · Hare Pose

Śaśāṅkāsana is a restful kneeling forward bend that stretches the spine and calms the mind. Śaśāṅka is usually translated as 'hare' and āsana means 'pose'.

How to do it

  1. Sit in Vajrāsana with your spine straight.
  2. Breathe in and stretch your arms overhead.
  3. Breathe out, fold forward from the hips and bring your chest towards your thighs.
  4. Stretch your arms forward on the mat, palms down, and rest your forehead on the floor, relaxing your neck and shoulders.
  5. Hold for 20–30 seconds, breathing deeply.
  6. Breathe in and roll up slowly to Vajrāsana, keeping your spine straight.

Hold: 20–30 seconds

Benefits

  • Calms the nervous system and eases stress and anxiety.
  • May support digestion and ease constipation.
  • Stretches the spine and back muscles, releasing lower-back tension.
  • Some people find it soothes menstrual cramps.
  • Encourages slow, deep breathing.

Precautions

  • Severe knee pain or injury: use a cushion or skip the pose.
  • High blood pressure or dizziness: don't hold the pose for long.
  • Pregnancy: keep the knees wider apart and avoid folding deeply.
  • Vertigo or severe back problems: modify with support or avoid the pose.
Woman demonstrating Gomukhāsana, cow face pose

Gomukhāsana

Gomukhasana · Cow Face Pose

Gomukhāsana is a seated pose that stretches the shoulders, chest, arms and hips, with the arms said to form a cow's ears and the legs its snout. Go means 'cow', mukha means 'face' and āsana means 'pose'.

How to do it

  1. Sit in Daṇḍāsana (legs stretched forward) with your spine straight.
  2. Bend your left leg and bring the heel near your right hip, left knee pointing forward.
  3. Cross your right leg over the left so the right knee sits directly above the left knee and the right foot rests near the left hip.
  4. Raise your right arm, bend the elbow behind your head and reach your right hand down your upper back.
  5. Bring your left arm behind your back and try to hold the fingers of your right hand.
  6. Keep your spine upright, look forward and hold for 20–30 seconds.
  7. Release, then repeat with the arms and legs switched.

Hold: 20–30 seconds each side

Benefits

  • Opens the shoulders and chest, helping flexibility and posture.
  • Stretches the hips and thighs.
  • Eases shoulder and neck stiffness from sitting for long hours.
  • May support digestion.
  • Can help reduce stress and anxiety.
  • Supports deeper breathing.

Precautions

  • Severe shoulder or knee injury: avoid, or use a strap for the arms.
  • Pregnancy: avoid deep stretching and sit comfortably.
  • Sciatica or hip pain: use props or change the leg position.
  • Stiff shoulders: use a yoga belt to bridge the gap between your hands.
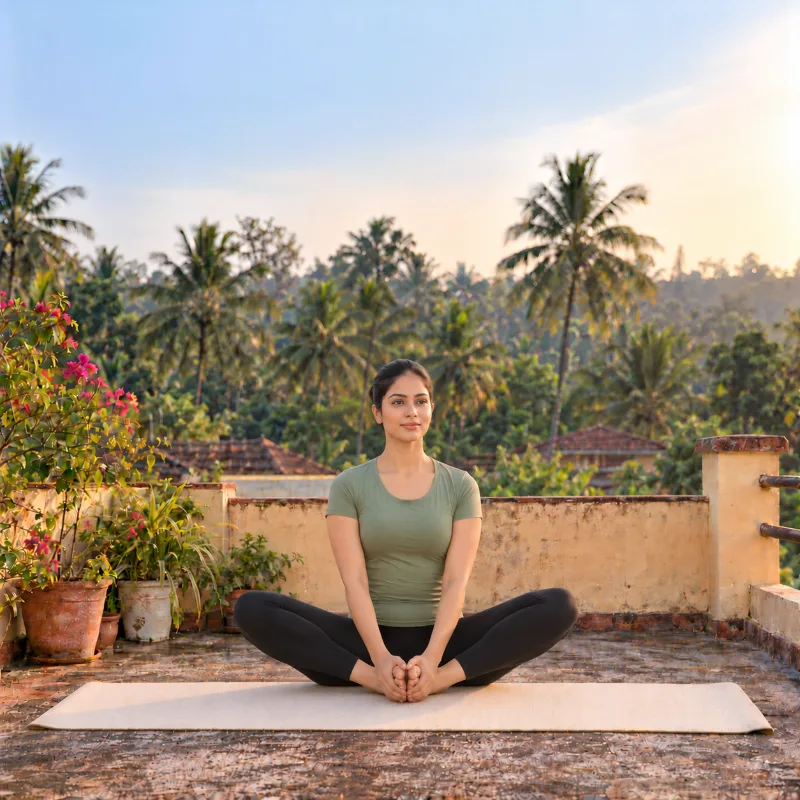
Woman demonstrating Bhadrāsana, gracious pose

Bhadrāsana

Bhadrasana · Gracious Pose

Bhadrāsana, also called the Gracious or Butterfly Pose, is a seated pose with the soles of the feet together that opens the hips and suits meditation. Bhadra means 'gracious' or 'auspicious' and āsana means 'pose'.

How to do it

  1. Sit in Daṇḍāsana (legs stretched forward) with your spine straight.
  2. Bend your knees and bring the soles of your feet together.
  3. Hold your feet with your hands and draw your heels as close to your pelvis as is comfortable.
  4. Let your knees drop towards the floor naturally, without forcing them.
  5. Keep your back straight, look forward and breathe deeply.
  6. Hold for 1–2 minutes, feeling the stretch in your inner thighs and hips.
  7. Release slowly and stretch your legs forward back into Daṇḍāsana.

Hold: 1–2 minutes

Benefits

  • Improves hip and groin flexibility and stretches the inner thighs.
  • May support digestion and ease constipation.
  • Calms the mind, aids focus and eases stress.
  • Gives a steady seat for meditation and pranayama.
  • May ease lower-back stiffness.

Precautions

  • Severe knee or hip pain: avoid, or place cushions under your knees.
  • Recent hip or abdominal surgery: practise only under expert guidance.
  • Pregnancy: keep the knees comfortable and avoid deep stretches.
  • Sciatica or stiff joints: use props for support.
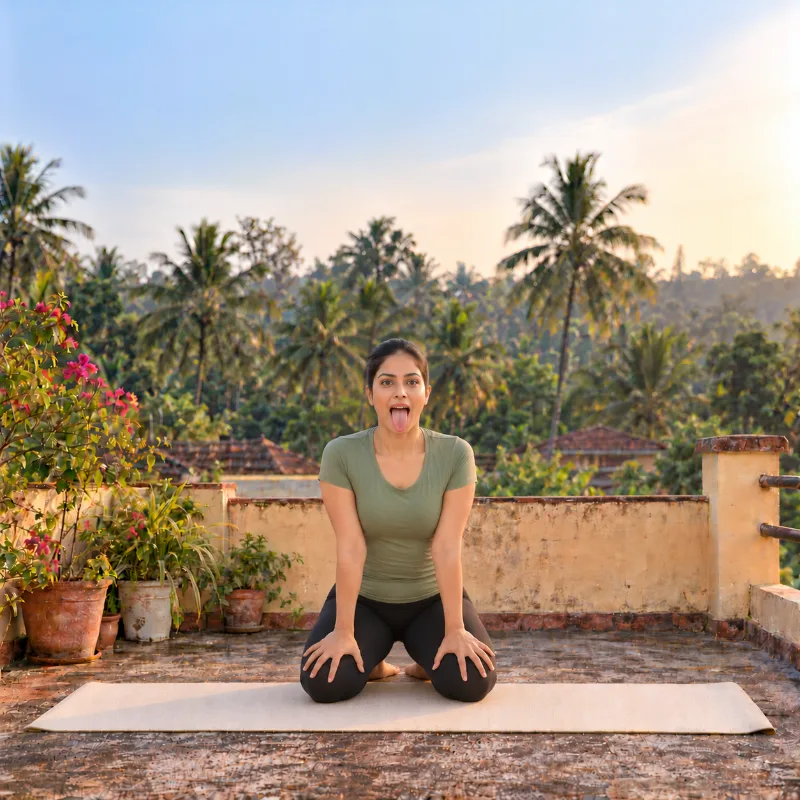
Woman demonstrating Siṃhāsana, lion pose

Siṃhāsana

Simhasana · Lion Pose

Siṃhāsana is a playful kneeling pose in which you breathe out with a lion-like roar to release tension. Siṃha means 'lion' and āsana means 'pose'.

How to do it

  1. Sit in Vajrāsana with your knees slightly apart.
  2. Place your hands on your knees with your fingers spread wide.
  3. Breathe in deeply through your nose.
  4. Breathe out forcefully through your mouth, sticking your tongue out, opening your eyes wide and making a 'ha' sound like a roaring lion.
  5. Hold the expression for a few seconds and feel the tension release.
  6. Repeat 3–5 times, breathing deeply throughout.

Hold: A few seconds, 3–5 rounds

Benefits

  • Helps release stress and tension.
  • Exercises the throat and face muscles.
  • Can feel freeing and help with self-expression and confidence.

Precautions

  • Severe throat or vocal cord problems: practise gently.
  • High blood pressure or dizziness: avoid forceful breathing out, and practise with caution.
  • Recent face or neck surgery: check with a doctor before practising.
  • Knee injury or weak joints: avoid this pose.
  • Severe lower-back pain or slipped disc: check with a doctor first.
  • Pregnancy: practise only under supervision.

Lying on the stomach

Woman demonstrating Bhujaṅgāsana, cobra pose

Bhujaṅgāsana

Bhujangasana · Cobra Pose

Bhujaṅgāsana is a gentle backbend from lying on your stomach that strengthens the spine and opens the chest, and is one of the poses in the Sun Salutation (Surya Namaskar). Bhujaṅga means 'cobra' and āsana means 'pose'.

How to do it

  1. Lie on your stomach with your legs stretched out and feet together.
  2. Place your palms under your shoulders, elbows close to your body.
  3. Breathe in, press your palms into the floor and lift your chest, arching your back.
  4. Keep your elbows slightly bent rather than locking your arms, and engage your core and thighs so your lower back doesn't take all the load.
  5. Hold for 20–30 seconds, breathing deeply with your shoulders relaxed.
  6. Breathe out and lower yourself gently to the mat.
  7. Repeat 2–3 times, keeping your breath steady.

Hold: 20–30 seconds, 2–3 rounds

Benefits

  • Strengthens the spine and back muscles, helping posture and flexibility.
  • Opens the chest and encourages fuller breathing.
  • May support digestion and ease constipation.
  • Can help ease stress and fatigue.
  • May ease lower-back discomfort.

Precautions

  • Severe back or spine injury: avoid, or lift only gently.
  • Pregnancy: avoid deep backbends.
  • Herniated disc or recent surgery: practise only under guidance.
  • High blood pressure or migraine: don't hold the pose for long.
Woman demonstrating Śalabhāsana, locust pose

Śalabhāsana

Shalabhasana · Locust Pose

Śalabhāsana is a backbend from lying on your stomach that strengthens the back, core and legs. Śalabha means 'locust' or 'grasshopper' and āsana means 'pose'.

How to do it

  1. Lie on your stomach with your legs together and arms by your sides.
  2. Turn your palms down, either beside your thighs or under your hips.
  3. Breathe in and lift your legs, chest and arms off the floor, using your lower back and core.
  4. Look forward, keeping your neck in a neutral position.
  5. Hold for 20–30 seconds, breathing deeply.
  6. Breathe out and lower down slowly to rest on the mat.
  7. Repeat 2–3 times, keeping your breath steady.

Hold: 20–30 seconds, 2–3 rounds

Benefits

  • Strengthens the lower back and spine and helps posture.
  • May support digestion and ease constipation.
  • Tones the glutes, thighs and core.
  • Opens the chest and encourages fuller breathing.
  • Can lift energy levels.

Precautions

  • Severe back or spine injury: avoid, or lift only gently.
  • Herniated disc or recent surgery: practise only under guidance.
  • Pregnancy: avoid this pose.
  • High blood pressure or heart problems: don't overstrain.
Woman demonstrating Dhanurāsana, bow pose

Dhanurāsana

Dhanurasana · Bow Pose

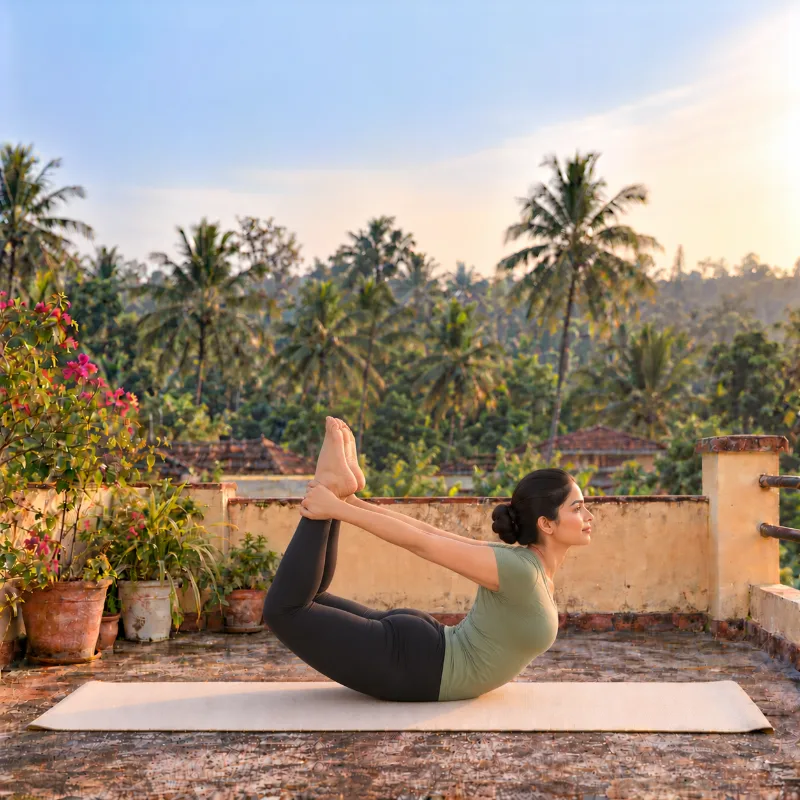
Dhanurāsana is a backbend from lying on your stomach in which the body curves like a bow and the arms act as its string. Dhanur means 'bow' and āsana means 'pose'.

How to do it

  1. Lie on your stomach with your legs hip-width apart and arms by your sides.
  2. Bend your knees and bring your heels close to your buttocks, feet hip-width apart.
  3. Reach back and hold your ankles firmly.
  4. Breathe in and lift your chest and thighs off the floor, using your back and core.
  5. Pull your legs up and back, keeping your arms straight and gaze forward.
  6. Hold for 20–30 seconds, breathing deeply and staying balanced.
  7. Breathe out, slowly lower your chest and legs, and relax in Makarāsana.

Hold: 20–30 seconds

Benefits

  • Strengthens the back and core and improves spinal flexibility.
  • Opens the chest and encourages fuller breathing.
  • May support digestion and ease constipation.
  • Tones the legs, arms and shoulders.
  • Can ease stress and fatigue and lift your mood.
  • Supports posture and may help ease back discomfort.

Precautions

  • Severe back or neck injury: avoid, or do gentler backbends instead.
  • Herniated disc or recent surgery: practise only under expert guidance.
  • Pregnancy: avoid this pose.
  • High blood pressure or heart problems: don't hold the pose for long.
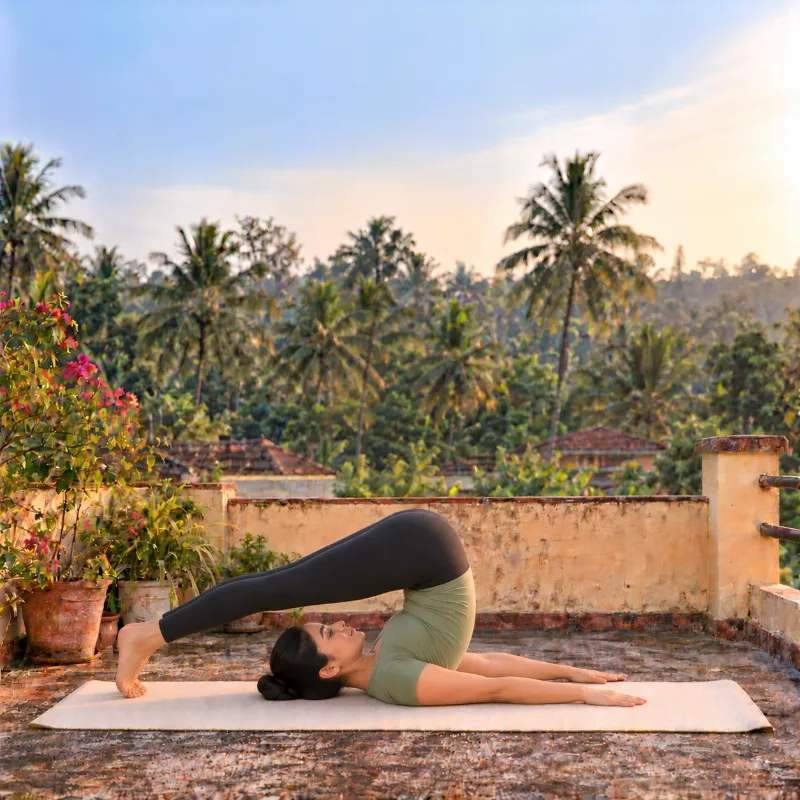
Woman demonstrating Makarāsana, crocodile pose

Makarāsana

Makarasana · Crocodile Pose

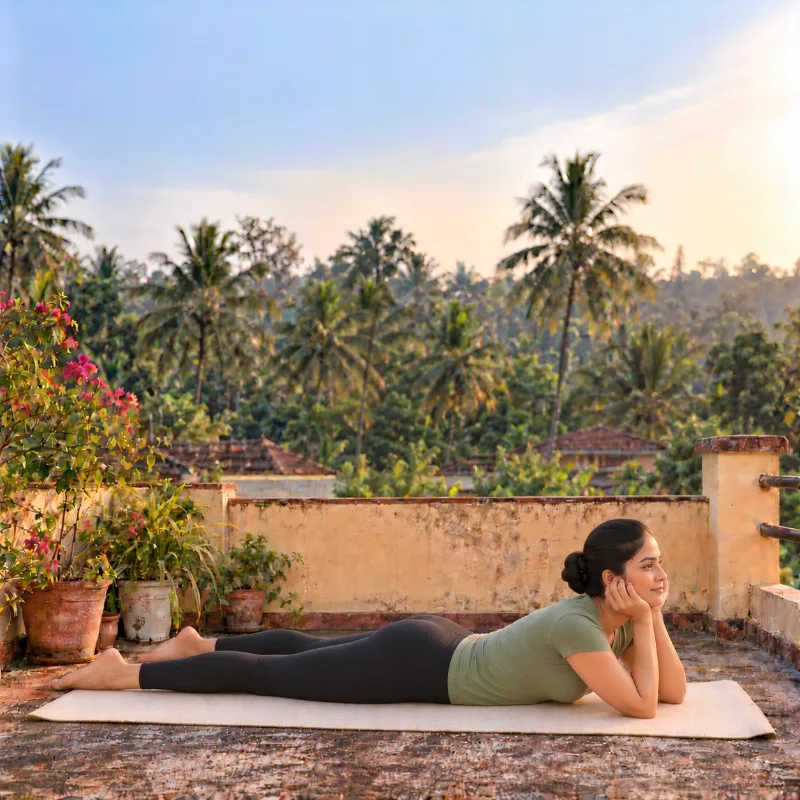
Makarāsana is a restful pose lying on your stomach, like a crocodile at rest, often used to relax after backbends. Makara means 'crocodile' and āsana means 'pose'.

How to do it

  1. Lie on your stomach with your legs stretched out and slightly apart.
  2. Bring your elbows forward and rest your chin or forehead on your palms, keeping your neck relaxed.
  3. Let your whole body sink into the floor, breathing slowly and deeply.
  4. Stay for 2–5 minutes, breathing naturally.
  5. To come out, slowly lower your arms, turn your head to one side and relax.

Hold: 2–5 minutes

Benefits

  • May ease back and neck tension.
  • Promotes deep relaxation and calms the nervous system.
  • Supports good posture.
  • Encourages slow, deep breathing.
  • May help ease bloating.

Precautions

  • Severe lower-back pain: avoid unless a professional advises it.
  • Recent abdominal surgery: do not practise this pose.
  • Pregnancy: check with a yoga expert before practising.
  • Neck or lower-back discomfort: adjust your position.

Lying on the back

Woman demonstrating Uttānapādāsana, raised legs pose

Uttānapādāsana

Uttanpadasana · Raised Legs Pose

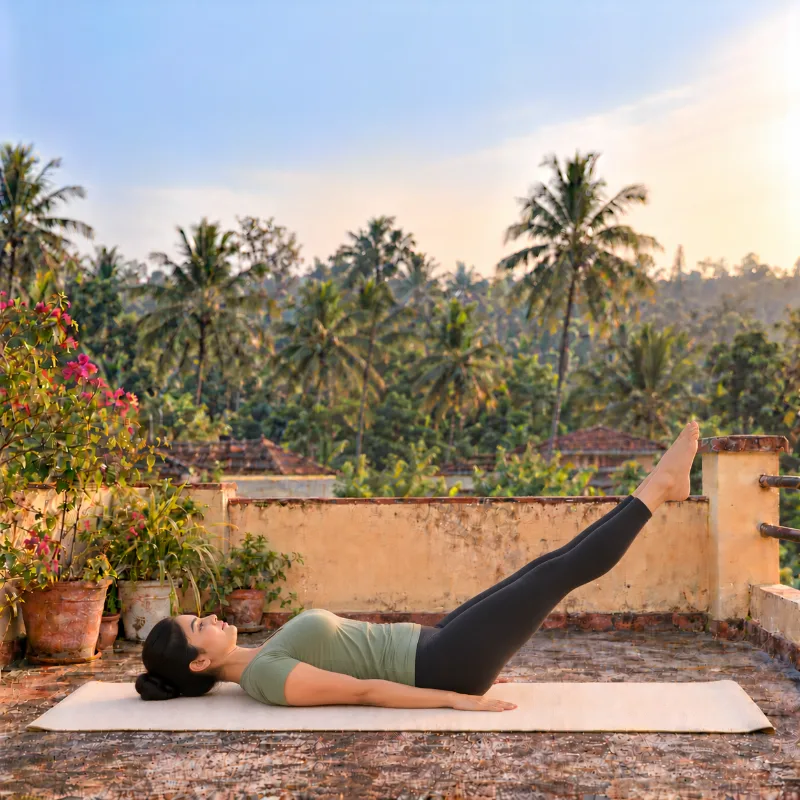
Uttānapādāsana is a core-strengthening pose in which you lift your straight legs while lying on your back. Uttāna means 'raised' or 'extended', pāda means 'leg' and āsana means 'pose'.

How to do it

  1. Lie on your back with your legs stretched out and arms beside your body.
  2. Breathe in and engage your core, keeping your legs straight.
  3. Raise both legs together to 40–45 degrees, keeping them straight.
  4. Press your palms into the floor to stay steady.
  5. Hold for 10–30 seconds, breathing deeply.
  6. Breathe out and lower your legs slowly, without jerking.
  7. If it feels comfortable, repeat for 2–3 rounds.

Hold: 10–30 seconds, 2–3 rounds

Benefits

  • Strengthens and tones the abdominal muscles.
  • May support digestion and ease bloating.
  • Builds stability in the lower back and hips.
  • Strengthens the thighs, hips and lower abdomen.

Precautions

  • Severe back pain or lower-back problems: avoid, or practise with caution.
  • Hernia or recent abdominal surgery: avoid, as the pose puts pressure on the abdomen.
  • Pregnancy: not recommended, as it strains the abdomen.
  • High blood pressure or heart problems: don't hold your breath while lifting your legs.
Woman demonstrating Ardha Halāsana, half plough pose

Ardha Halāsana

Ardha Halasana · Half Plough Pose

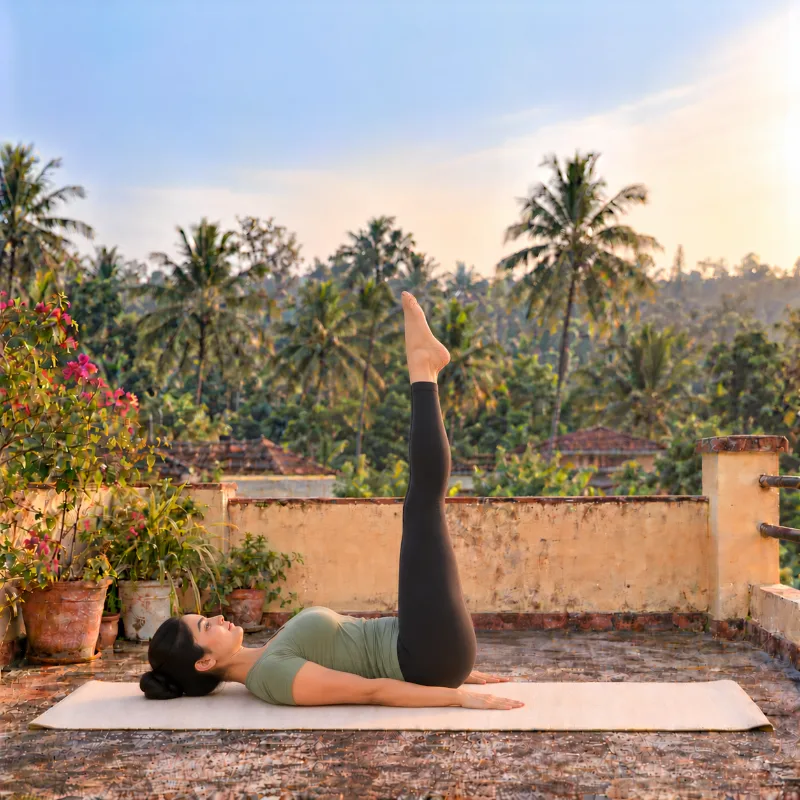
Ardha Halāsana is a preparation for Halāsana in which you lift your straight legs to 90 degrees while lying on your back. Ardha means 'half', hala means 'plough' and āsana means 'pose'.

How to do it

  1. Lie on your back with your legs stretched out and arms by your sides.
  2. Breathe in and engage your core, keeping your legs straight and pressing your palms into the floor.
  3. Raise both legs together to 90 degrees, keeping them straight.
  4. Hold for 10–30 seconds, breathing deeply.
  5. Breathe out and lower your legs slowly and with control.
  6. If it feels comfortable, repeat for 2–3 rounds.

Hold: 10–30 seconds, 2–3 rounds

Benefits

  • Strengthens and tones the abdominal muscles.
  • May support digestion and ease constipation.
  • Strengthens the thighs, hips and lower back.
  • May ease lower-back stiffness.

Precautions

  • Severe back pain: keep your knees slightly bent.
  • Hernia or recent abdominal surgery: avoid, as the pose puts pressure on the abdomen.
  • Pregnancy: not recommended.
  • High blood pressure or heart problems: don't hold your breath while lifting your legs.
Woman demonstrating Halāsana, plough pose

Halāsana

Halasana · Plough Pose

Halāsana is an advanced inverted pose in which the legs go over the head, stretching the whole spine. Hala means 'plough', a traditional farming tool, and āsana means 'pose'.

How to do it

  1. Lie on your back with your legs stretched out and arms beside your body.
  2. Breathe in and raise both legs to 90 degrees, keeping them straight.
  3. Support your lower back with your hands as your hips lift.
  4. Breathe out and slowly take your legs over your head towards the floor.
  5. If you can, rest your toes on the floor with your legs straight; keep your hands on your back or stretch your arms along the mat.
  6. Hold for 15–30 seconds, breathing deeply.
  7. Breathe out and roll back down slowly, using your core to lower your legs gently to the mat.

Hold: 15–30 seconds

Benefits

  • Stretches and lengthens the spine.
  • Strengthens the abdominal muscles and lower back.
  • May support digestion and ease bloating and constipation.
  • Can help you relax and ease fatigue.

Precautions

  • Severe back or neck pain: avoid, as the pose puts pressure on the spine.
  • High blood pressure or heart problems: take care, as inversions can be risky for some people.
  • Pregnancy: not recommended.
  • All practitioners: avoid jerky movements and always move slowly to prevent strain or injury.
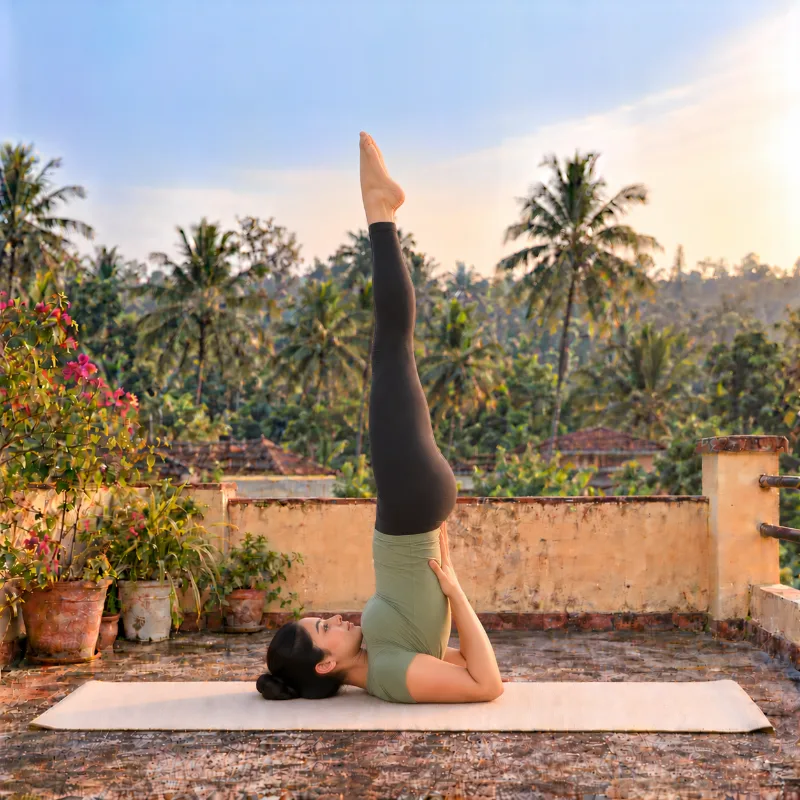
Woman demonstrating Sarvāṅgāsana, shoulder stand

Sarvāṅgāsana

Sarvangasana · Shoulder Stand

Sarvāṅgāsana is an inverted pose balanced on the shoulders that works the whole body, and is often called the 'Queen of Asanas'. Sarva means 'whole', aṅga means 'body' or 'limb' and āsana means 'pose'.

How to do it

  1. Lie on your back with your legs stretched out and arms beside your body.
  2. Breathe in and raise both legs to 90 degrees, keeping them straight.
  3. Engage your core and lift your hips and back, supporting your lower back with your hands.
  4. Bring your legs, hips and torso into one vertical line, resting on your shoulders.
  5. Point your toes, keep your legs firm and look towards your chest.
  6. Hold for 30–60 seconds, breathing steadily.
  7. Breathe out and lower your back slowly, using your core for control.

Hold: 30–60 seconds

Benefits

  • Strengthens the core and shoulders and supports posture.
  • May support digestion and ease constipation.
  • Can help calm the nervous system and ease stress and fatigue.

Precautions

  • Neck or spine problems: avoid, as the pose puts pressure on the neck.
  • High blood pressure or heart conditions: take care, as inversions can cause dizziness or discomfort.
  • Pregnancy: not recommended.
  • Eye conditions such as glaucoma: avoid, as the pressure can make them worse.
  • All practitioners: don't rush; enter and leave the pose slowly to prevent injury.
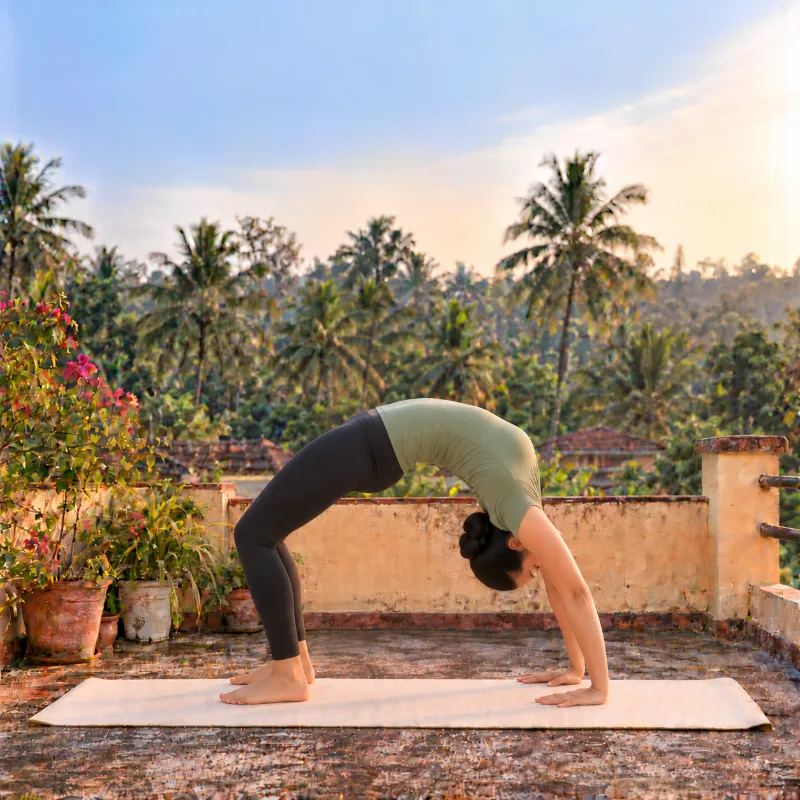
Woman demonstrating Cakrāsana, wheel pose

Cakrāsana

Chakrasana · Wheel Pose

Cakrāsana is an advanced backbend in which the body arches up into a wheel shape. Cakra means 'wheel' and āsana means 'pose'.

How to do it

  1. Lie on your back with your legs stretched out and arms by your sides.
  2. Bend your knees and place your feet on the floor, hip-width apart and close to your buttocks.
  3. Bend your elbows and place your palms on the floor beside your ears, fingers pointing towards your shoulders.
  4. Breathe in, push through your palms and feet, and lift your hips and torso.
  5. Arch your back and try to straighten your arms fully, curving your body like a wheel.
  6. Hold for 10–30 seconds, breathing steadily.
  7. Breathe out, bend your elbows and knees, lower your back gently and relax in Śavāsana for a few breaths.

Hold: 10–30 seconds

Benefits

  • Improves spinal mobility and eases stiffness.
  • Strengthens the arms, legs and core.
  • Opens the chest and encourages fuller breathing.
  • Can leave you feeling energised and less stressed.
  • May support digestion.
  • Supports posture and balance.

Precautions

  • Severe back or neck pain: avoid, as the pose puts pressure on the spine.
  • High blood pressure or heart conditions: take care, as the pose can be risky for some people.
  • Pregnancy: not recommended.
  • Wrist or shoulder injury: take care, as the pose needs strong, stable wrists and shoulders.
  • All practitioners: don't force the backbend; warm up properly first.
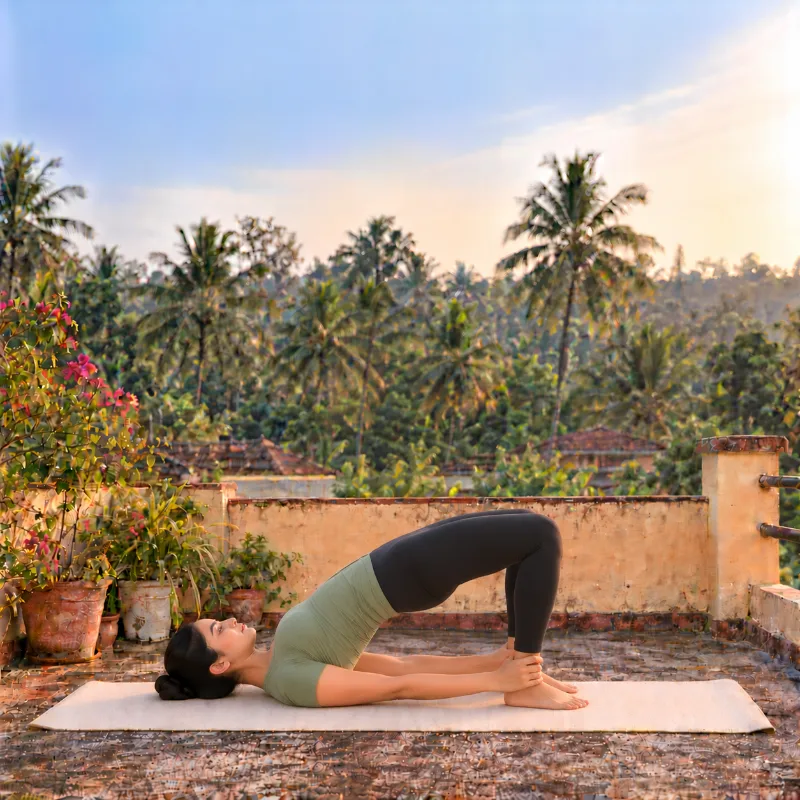
Woman demonstrating Setu Bandhāsana, bridge pose

Setu Bandhāsana

Setu Bandhasana · Bridge Pose

Setu Bandhāsana is a backbend from lying on your back in which the body lifts into a bridge shape. Setu means 'bridge', bandha means 'lock' or 'bind' and āsana means 'pose'.

How to do it

  1. Lie on your back, bend your knees and place your feet on the floor, hip-width apart and close to your hips.
  2. Rest your arms beside your body, palms down.
  3. Breathe in, press through your feet and raise your hips towards the ceiling.
  4. Engage your core and thighs, keeping your thighs parallel and without over-arching.
  5. Hold both ankles with your hands.
  6. Hold for 20–30 seconds, breathing steadily.
  7. Breathe out and lower your spine slowly, one vertebra at a time, then rest in Śavāsana for a few breaths.

Hold: 20–30 seconds

Benefits

  • Strengthens the spine and back muscles, easing stiffness.
  • Opens the chest and encourages fuller breathing.
  • May support digestion and ease constipation.
  • Can help calm the nervous system and ease stress.
  • Strengthens the thighs, hamstrings, hips and glutes.

Precautions

  • High blood pressure or heart problems: stop if you feel any discomfort.
  • Pregnancy: can be practised with support, but avoid straining.
  • Recent abdominal surgery: avoid, as the pose puts pressure on the abdomen.
  • All practitioners: don't over-arch your back; keep the spine in its natural line.
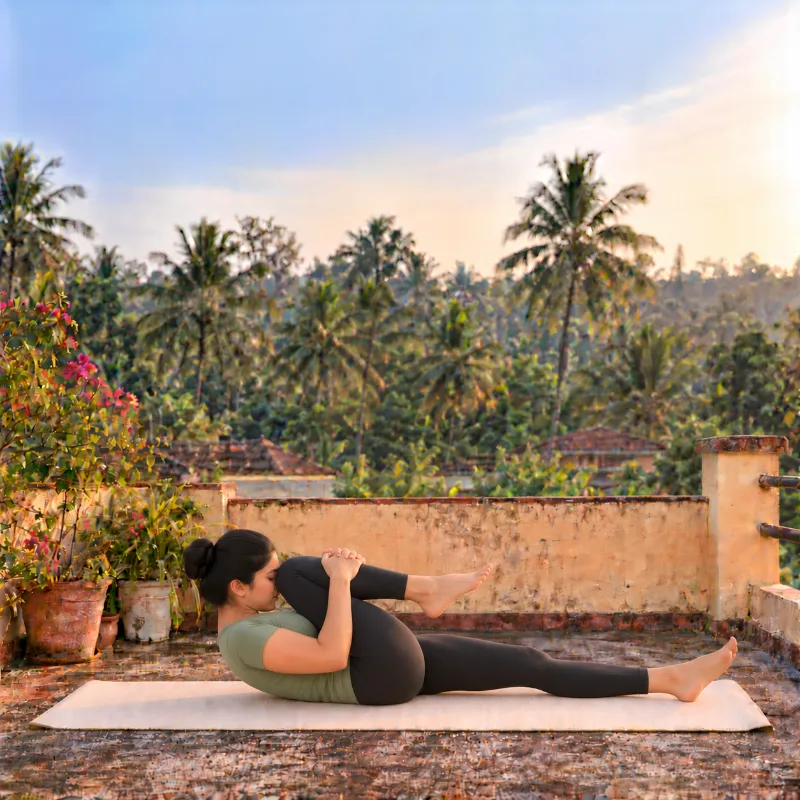
Woman demonstrating Pavanamuktāsana, wind-relieving pose

Pavanamuktāsana

Pawanmuktasana · Wind-Relieving Pose

Pavanamuktāsana is a simple pose lying on your back and hugging the knees in, used to release trapped wind and support digestion. Pavana means 'wind', mukta means 'release' and āsana means 'pose'.

How to do it

  1. Lie on your back with your legs stretched out and arms by your sides.
  2. Bend your right knee, draw it towards your chest and hug it with both hands.
  3. Lift your head towards your knee, trying to touch it with your nose or chin.
  4. Hold for 10–15 seconds, breathing deeply, then release and repeat with the left leg.
  5. For the advanced version, hug both knees in together and hold.
  6. Release slowly and relax in Śavāsana, breathing deeply.

Hold: 10–15 seconds each side

Benefits

  • Can help release gas and ease bloating.
  • Works the core and abdominal muscles.
  • May ease lower-back stiffness.
  • Some people find the gentle pressure on the belly eases menstrual cramps.

Precautions

  • Recent abdominal surgery: avoid, or practise only under medical guidance.
  • Pregnancy: avoid compressing the abdomen.
  • Herniated disc or severe back pain: keep the movements gentle.
  • High blood pressure or heart problems: don't lift your head too much.
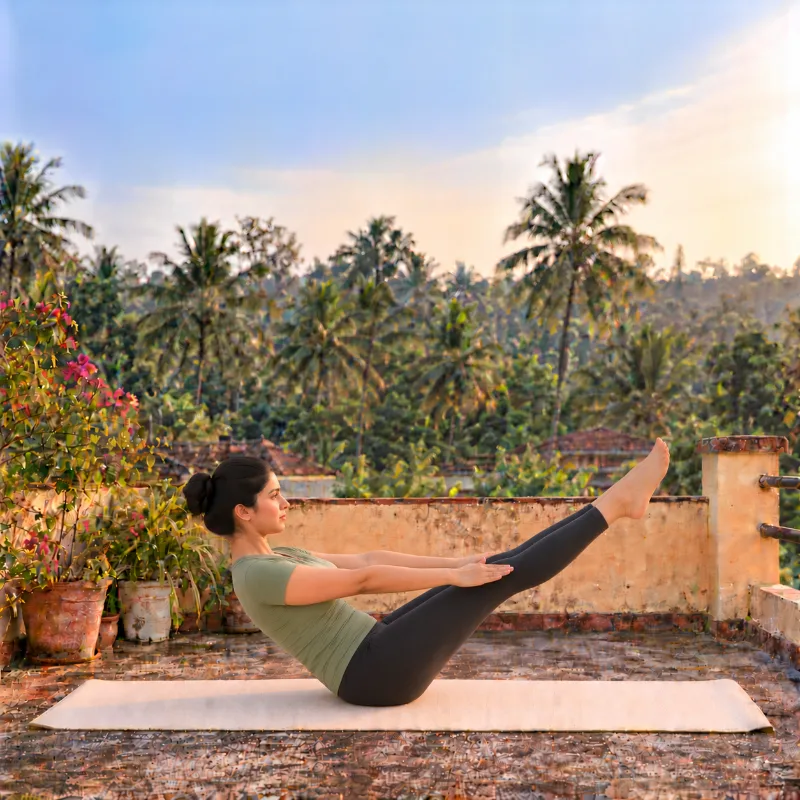
Woman demonstrating Naukāsana, boat pose

Naukāsana

Naukasana · Boat Pose

Naukāsana is a core-strengthening pose in which you balance on your buttocks with the body shaped like a boat. Naukā means 'boat' and āsana means 'pose'.

How to do it

  1. Lie on your back with your legs together and arms by your sides.
  2. Breathe in and lift your upper body and legs, stretching your arms forward parallel to the floor.
  3. Balance on your buttocks, keeping your back straight and core engaged.
  4. Hold for 10–20 seconds, breathing deeply and staying steady.
  5. Breathe out and lower down slowly, then rest and repeat 2–3 times.

Hold: 10–20 seconds, 2–3 rounds

Benefits

  • Strengthens and tones the abdominal muscles.
  • May support digestion.
  • Builds balance, coordination and focus.
  • Strengthens the lower back and spine.

Precautions

  • Severe back or spine problems: avoid, or modify with support.
  • Pregnancy: not recommended.
  • Hernia or recent abdominal surgery: practise only under expert guidance.
  • High blood pressure or heart problems: avoid long holds.
Woman demonstrating Markaṭāsana, monkey pose

Markaṭāsana

Markatasana · Monkey Pose

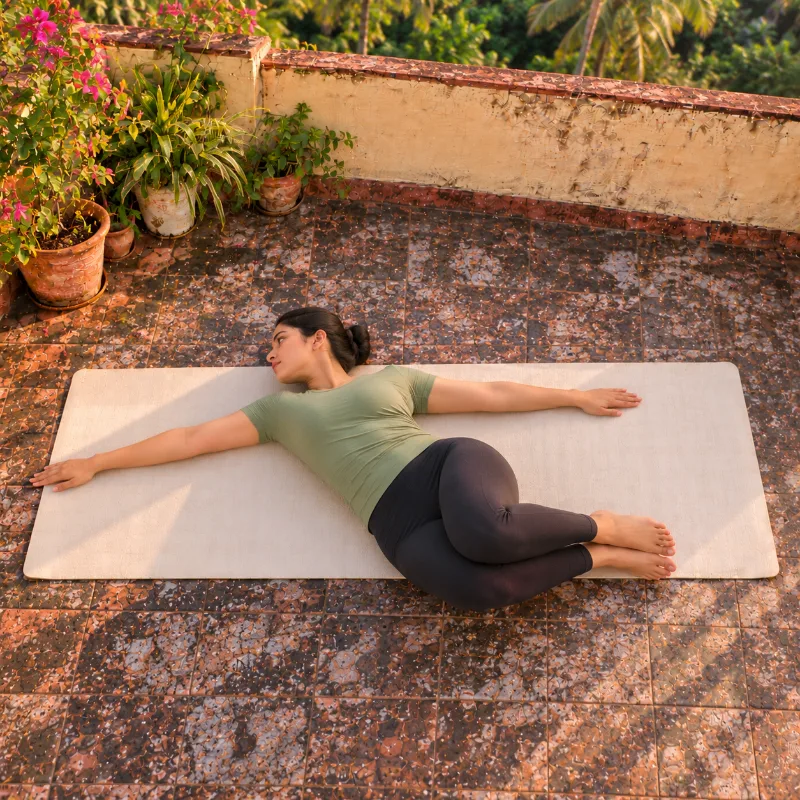
Markaṭāsana is a gentle spinal twist done lying on your back, named for the playful movements of a monkey. Markaṭa means 'monkey' and āsana means 'pose'.

How to do it

  1. Lie on your back with your legs stretched out and arms out to the sides.
  2. Bend your knees and bring your feet close to your hips, keeping them together.
  3. Let both knees drop to the right while your torso twists the other way.
  4. Turn your head to the left, keeping your shoulders relaxed on the mat.
  5. Hold for 20–30 seconds, breathing deeply into the twist.
  6. Return to the centre and repeat on the other side.

Hold: 20–30 seconds each side

Benefits

  • Eases stiffness in the back and spine and improves mobility.
  • May support digestion and ease constipation.
  • May ease lower-back discomfort.
  • Relaxes the nervous system and eases stress.
  • Opens the chest and encourages fuller breathing.

Precautions

  • Severe back or spinal injury: practise gently or under supervision.
  • Pregnancy: keep the twist minimal.
  • Herniated disc or recent surgery: check with a doctor before practising.
  • Dizziness or vertigo: move slowly and avoid sudden twists.
Woman demonstrating Śavāsana, corpse pose

Śavāsana

Shavasana · Corpse Pose

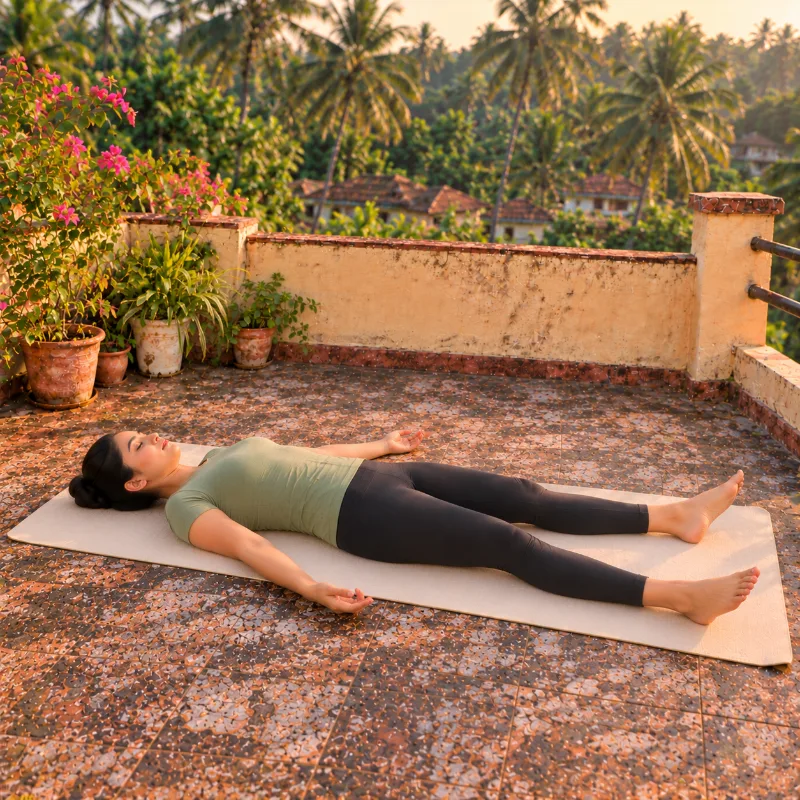
Śavāsana is a deep relaxation pose lying still on your back, usually practised at the end of a session. Śava means 'corpse' and āsana means 'pose'.

How to do it

  1. Lie on your back with your legs stretched out and arms by your sides.
  2. Let your feet fall naturally outwards and turn your palms up.
  3. Close your eyes and breathe slowly and naturally.
  4. Release tension from your whole body, from your toes up to your head.
  5. Stay still for 5–10 minutes.
  6. To come out, gently wiggle your fingers and toes, then roll onto one side before sitting up.

Hold: 5–10 minutes

Benefits

  • Can help reduce stress and calm the nervous system.
  • Supports concentration and mental clarity.
  • Helps the body recover after yoga or exercise.
  • May help you sleep better.
  • Leaves you feeling refreshed.

Precautions

  • All practitioners: try not to fall asleep; stay aware and present.
  • Lower-back pain: place a pillow under your knees.
  • Cold room: cover yourself with a light blanket.
  • Pregnancy: lie on your left side instead, for better circulation.

Arm balance & inversion

Woman demonstrating Bakāsana, crow pose

Bakāsana

Bakasana · Crow Pose

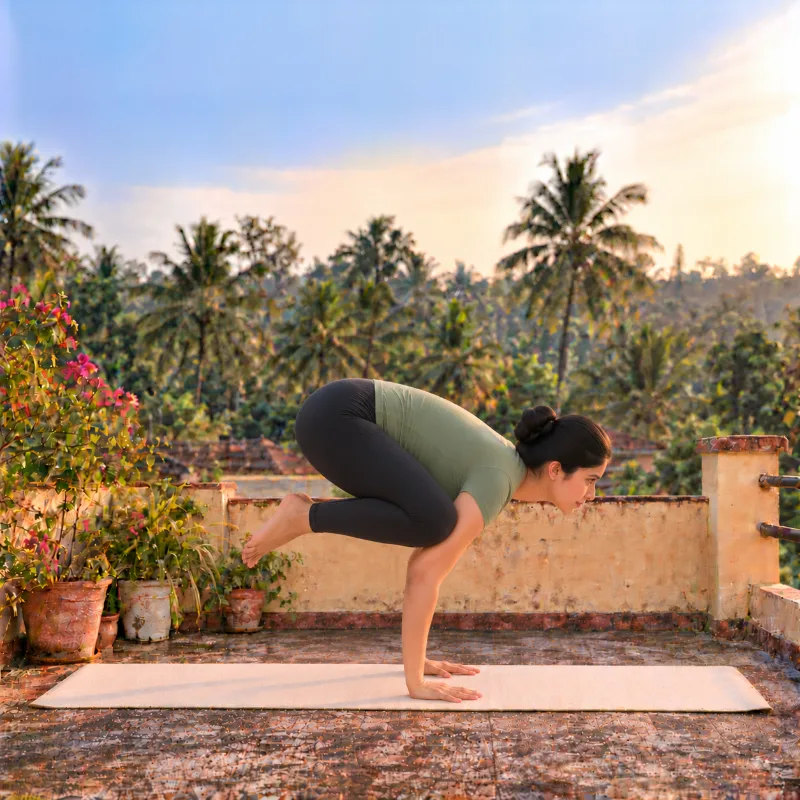
Bakāsana, commonly called Crow Pose, is an arm balance that builds strength, balance and focus. Baka literally means 'crane' and āsana means 'pose'.

How to do it

  1. Squat with your feet hip-width apart and place your hands on the floor shoulder-width apart, fingers spread wide and pressing firmly down.
  2. Bring your knees onto your upper arms, as close to your armpits as you can.
  3. Bend your elbows slightly and lean forward, shifting your weight into your hands.
  4. Engage your core and lift your feet off the floor, balancing on your hands.
  5. Hold for 10–20 seconds, breathing steadily and staying focused.
  6. Lower your feet gently back to the squat.
  7. Repeat 2–3 times, building up the hold as you get stronger.

Hold: 10–20 seconds, 2–3 rounds

Benefits

  • Strengthens the arms, wrists and shoulders.
  • Builds core strength and stability.
  • Improves balance, coordination and body awareness.
  • Builds confidence and focus as you work past the fear of falling.
  • Strengthens the back muscles and supports posture.

Precautions

  • Wrist, shoulder or elbow injury: avoid, or use props or support.
  • Pregnancy: not recommended.
  • High blood pressure or heart conditions: practise only under expert guidance.
  • Weak wrists or arthritis: practise on a soft surface or use wrist support.
  • All practitioners: don't rush; warm up properly and move with control.
Woman demonstrating Śīrṣāsana, headstand

Śīrṣāsana

Shirshasana · Headstand

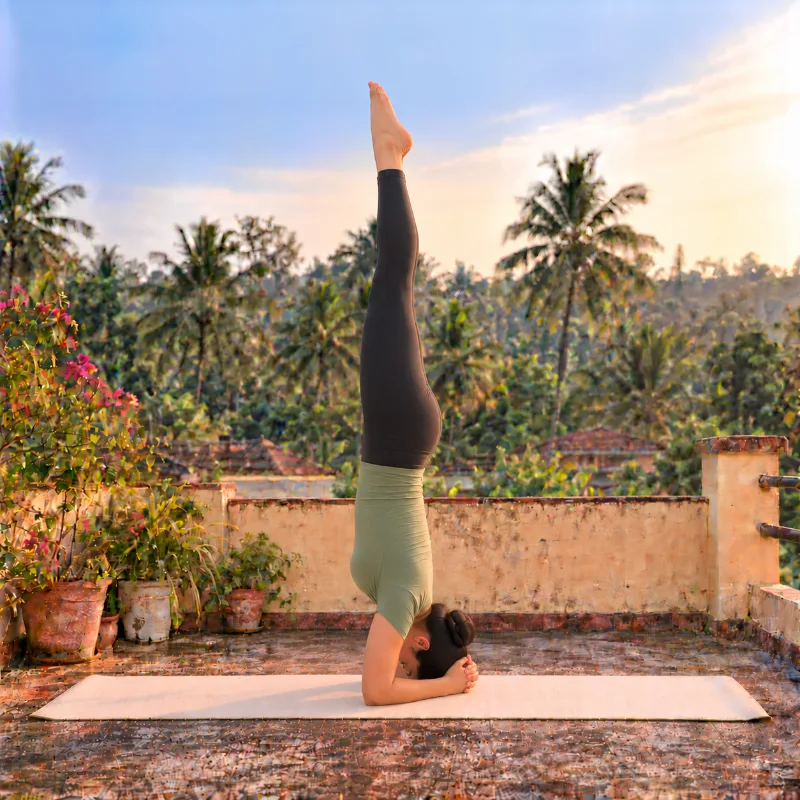
Śīrṣāsana is an inversion balanced on the head and forearms, often called the 'King of Asanas'. Śīrṣa means 'head' and āsana means 'pose'.

How to do it

  1. Kneel, sit on your heels and place your forearms on the mat.
  2. Interlock your fingers to form a triangle base, elbows shoulder-width apart.
  3. Place the crown of your head on the mat between your hands, spreading the weight evenly.
  4. Lift your knees and walk your feet closer, keeping your back straight.
  5. Engage your core and slowly raise one leg at a time, finding your balance, then straighten both legs into a vertical line.
  6. Hold for 10–30 seconds, breathing deeply, and build up the time gradually.
  7. Lower down slowly and rest in Child's Pose before repeating.

Hold: 10–30 seconds, building up gradually

Benefits

  • Strengthens the shoulders, arms and core.
  • Improves balance and body awareness.
  • Can help calm the nervous system and ease stress.
  • May support digestion.

Precautions

  • Neck, spine or shoulder injury: avoid, or practise only with modifications or expert guidance.
  • Pregnancy: not recommended.
  • High blood pressure or heart problems: check with a doctor before practising.
  • Beginners: use a wall for support and keep your movements controlled.
  • All practitioners: don't hold for too long; start short and build up gradually.

← Back to the library